Lenses and the Points Marked on Them
A lens is a piece of transparent glass or plastic with at least one curved surface. A convex lens is thicker in the middle than at its edges. It bends parallel rays of light inwards so that they come together at one point. A concave lens is thinner in the middle and thicker at its edges. It bends parallel rays outwards so that they spread apart. To say exactly where an image forms, the same few points and lines are marked on every ray diagram.
Optical centre (O): the central point of a lens. A ray of light passing through it goes straight on without bending.
Principal axis: the imaginary straight line that passes through the optical centre of a lens and through the centres of curvature of its two surfaces.
Principal focus (F): the point on the principal axis where rays travelling parallel to the principal axis meet after passing through a convex lens, or from where they appear to spread out after passing through a concave lens.
Focal length (f): the distance from the optical centre O of a lens to its focus F. The radius of curvature is twice the focal length.
Every ray diagram is drawn on the same frame. The principal axis is drawn as a horizontal line through the middle of the lens, and the centre of the lens is marked O. Light can reach a lens from either side, so a lens has a focus on each side. F is marked on both sides at one focal length from O, and 2F is marked on both sides at twice the focal length. For a lens whose focal length is 10 cm, F lies 10 cm from O and 2F lies 20 cm from O. The object is normally drawn on the left of the lens, so light travels from left to right.
Ray diagram: a drawing that uses straight lines with arrows to show the path of light from an object through a lens, and where the image forms.
Three Rules for Drawing Ray Diagrams
Light leaves every point of an object in all directions. We cannot draw every ray, and we do not need to. Three rays follow paths that are always known, so we choose two of them. A convex lens bends rays towards each other and a concave lens bends them apart, so each rule has one form for a convex lens and one for a concave lens.
- Rule 1: A ray passing through the optical centre of a lens does not bend. It carries on in a straight line. This is true for both a convex and a concave lens.
- Rule 2: A ray travelling parallel to the principal axis passes through the focus on the far side after passing through a convex lens. Through a concave lens the same ray bends away from the axis, and it appears to come from the focus on the side where it entered.
- Rule 3: A ray passing through the focus of a convex lens comes out parallel to the principal axis after refraction. For a concave lens, a ray aimed at the focus on the far side comes out parallel to the principal axis.
Any two of these three rays are enough. The point where the two refracted rays meet, or appear to meet, is where the image of that point forms.
Rules 2 and 3 are the reverse of each other, so they are easy to swap. A ray that goes in parallel comes out through the focus. A ray that goes in through the focus comes out parallel.
These rules can be tested in the laboratory. A laser beam is shone at a convex lens and then at a concave lens along each of the three paths, and the direction of the beam after it leaves the lens is noted each time.
Never look into a laser beam and never point it at anyone's face. Even a small laser pointer can damage the eye.
Drawing a Ray Diagram Step by Step
In a ray diagram the object is drawn as an upright arrow AB. Its foot B stands on the principal axis and its tip A points upwards. Because B lies on the axis, its image also lies on the axis, so only the tip A needs two rays. The steps are:
- Step 1: Draw the principal axis and the lens standing across it. Mark O at the centre, and F and 2F on both sides.
- Step 2: Draw the object AB at its given position, with B on the axis.
- Step 3: From A, draw a ray parallel to the principal axis as far as the lens. After the lens, draw it through F on the other side.
- Step 4: From A, draw a second ray straight through O without bending it.
- Step 5: Mark the point where the two refracted rays cross and call it A₁. This is the image of A.
- Step 6: Draw a perpendicular from A₁ to the principal axis. Its foot is B₁, and the arrow A₁B₁ is the image.
- Step 7: If the refracted rays spread apart and never cross, extend them backwards as dotted lines. The image forms where the dotted lines meet, and such an image is virtual.
Real image: an image formed where the refracted rays actually meet. It can be caught on a screen. A real image formed by a single lens is inverted.
Virtual image: an image formed where the refracted rays only appear to meet when they are extended backwards. It cannot be caught on a screen and can only be seen by looking through the lens. It is erect.
Whenever an image is described, four things are stated. The first is where it forms. The second is whether it is real or virtual. The third is whether it is erect, meaning the right way up, or inverted, meaning upside down. The fourth is its size compared with the object: magnified (larger), the same size, or diminished (smaller).
Watching a Convex Lens Form an Image
The image a convex lens makes can be watched with a candle, a lens whose focal length is already known, a small cardboard screen and a metre scale. The lens stands near the middle of the scale, with at least 2f of scale left on each side. The candle is placed on one side, and the screen is moved forward and backward on the other side until a sharp image of the flame appears on it.
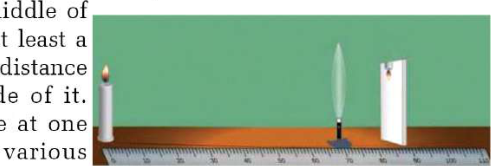
Moving the candle to different places shows that the image changes a great deal. When the candle is far from the lens, a small, upside down flame appears on a screen close to the lens. As the candle is brought nearer, the screen has to be moved further away, and the flame on it grows larger. When the candle is closer to the lens than F, no position of the screen gives an image at all. Looking through the lens from the other side, however, shows a large, upright candle. So the characteristics of the image depend on where the object stands compared with the optical centre O. The next six sections follow the object from very far away to very close.
Object at Infinity
An object is said to be at infinity when it is so far away that the rays reaching the lens from it are parallel to each other. The Sun, the Moon and a distant mountain are good examples. A convex lens bends all these parallel rays so that they meet at the focus F on the other side.
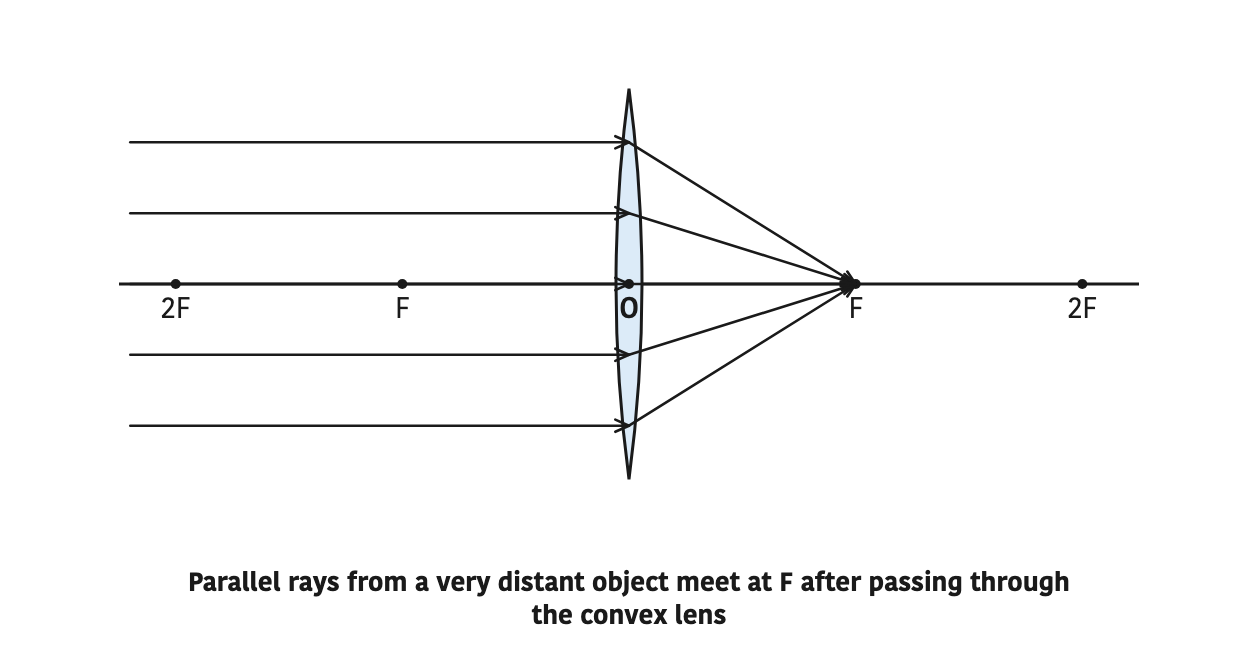
The image forms at F. It is real, inverted and highly diminished, often no bigger than a bright point. The objective lens of a telescope forms this kind of image of a distant star or planet. A hand lens held in sunlight does the same thing: the parallel rays of the Sun are gathered into a tiny bright spot at F. If the lens is held still for some time, a piece of paper at that spot can start to burn, because the lens has collected the Sun's radiation falling on its whole surface into one small spot.
Never look at the Sun through a lens, and never leave a lens lying in sunlight near paper, dry grass or cloth.
Object Beyond 2F
Now the object stands further from the lens than 2F. The ray from the tip A that travels parallel to the axis bends through F, and the ray through O goes straight on. The two cross on the other side of the lens, somewhere between F and 2F, below the axis.
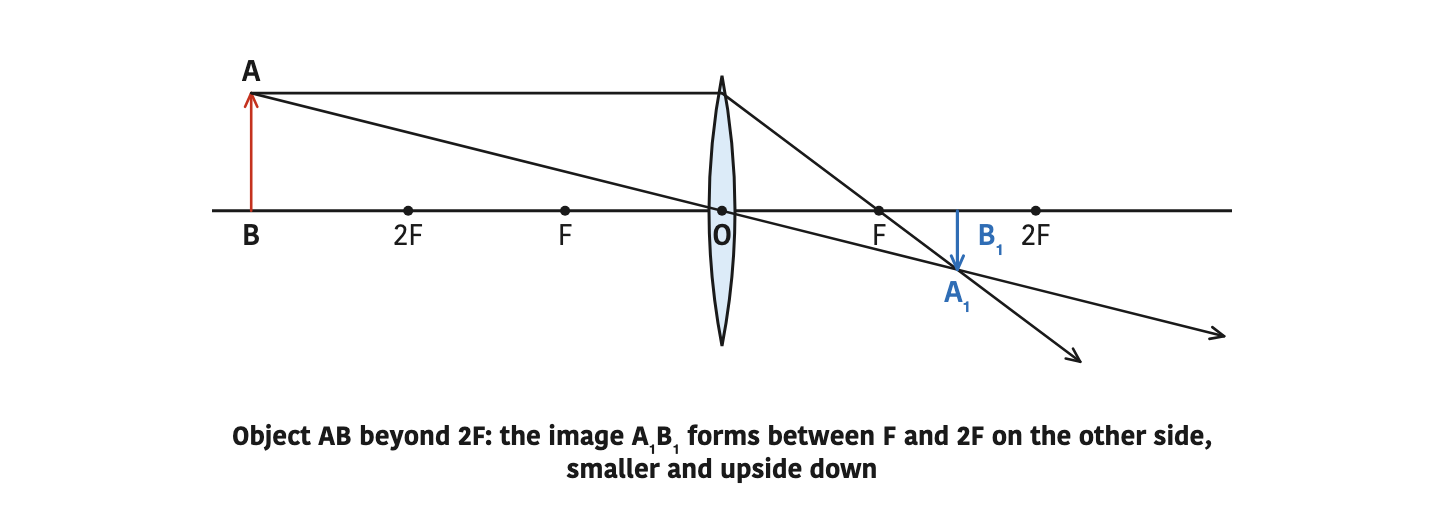
The image is formed between F and 2F. It is real, inverted and diminished. A camera works this way. The scene in front of a camera is usually far away, beyond 2F, so its lens forms a small, upside down, real image on the film or the image sensor at the back of the camera.
Object at 2F
When the object stands exactly at 2F, the two rays from A cross exactly at 2F on the other side. The image is formed at 2F. It is real, inverted and the same size as the object.
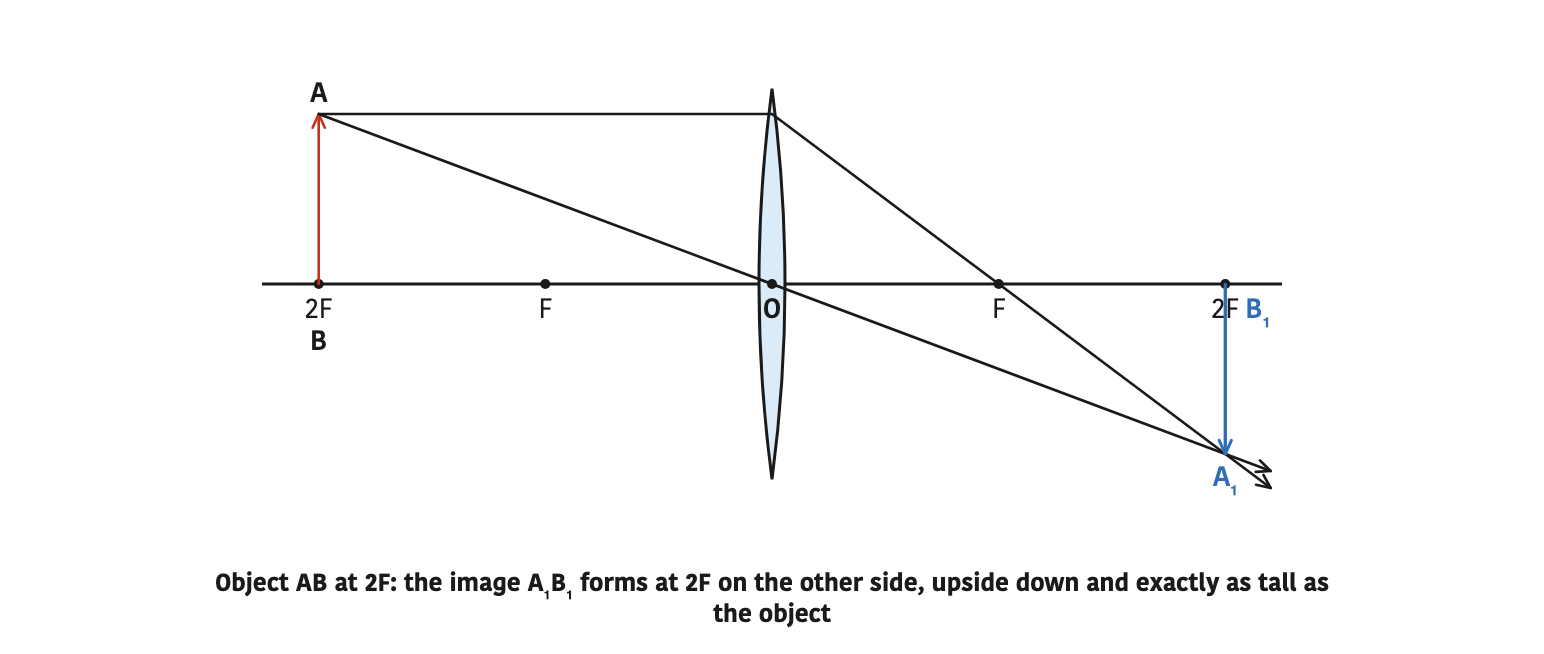
This arrangement is used in the erecting lens of a terrestrial telescope, the kind of telescope used to look at things on the Earth such as a far hillside or a bird. The first lens of such a telescope makes an upside down image. The erecting lens turns that image the right way up again without changing its size, so the viewer sees the scene upright.
Object Between F and 2F
When the object is between F and 2F, the two rays from A cross far out on the other side, beyond 2F. The image is formed beyond 2F. It is real, inverted and magnified.
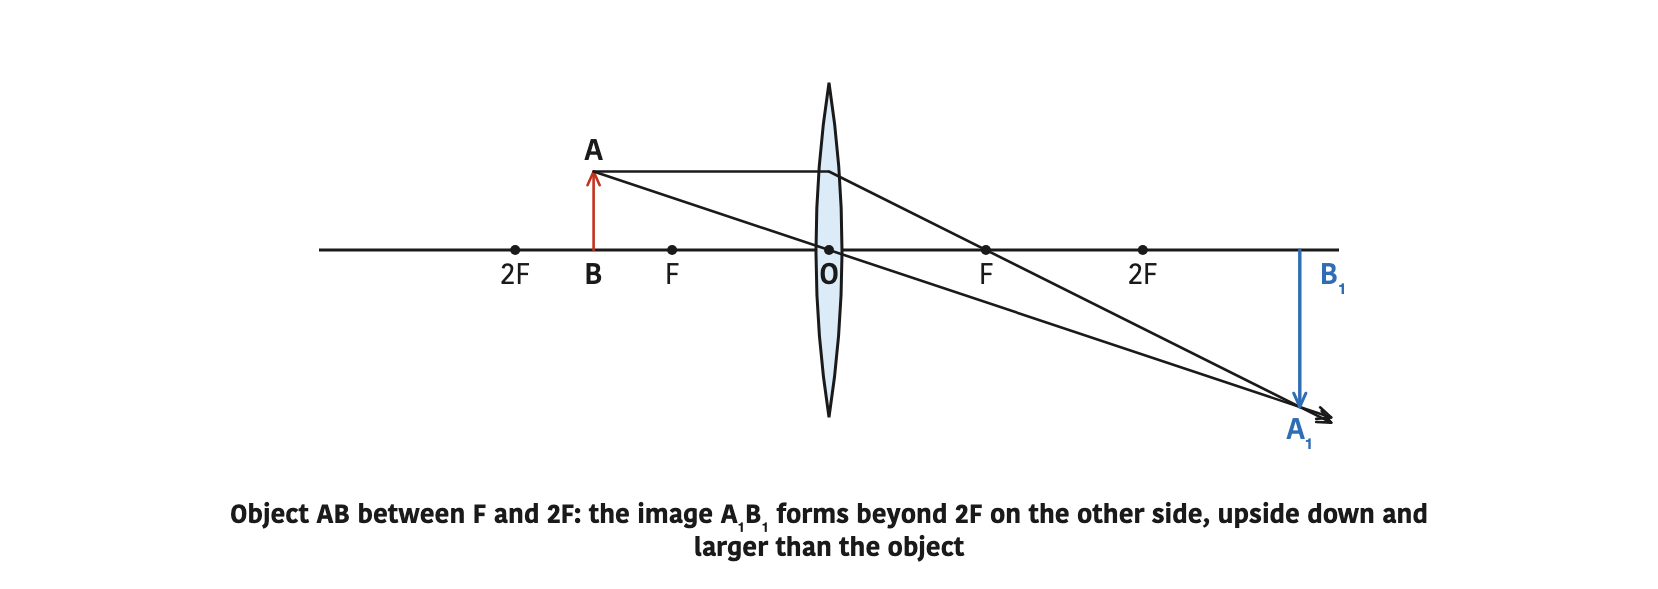
A projector uses exactly this arrangement. The small film or slide is placed a little beyond F of the lens, and a large, real image forms far away on the screen. Because this image is inverted, the film is put into the projector upside down, so the picture on the screen comes out the right way up.
Object at F
When the object stands at F, the ray from A through O and the ray from A that went in parallel both come out of the lens parallel to each other. Parallel rays never meet, so the image is said to form at infinity. It is real, inverted and highly magnified.
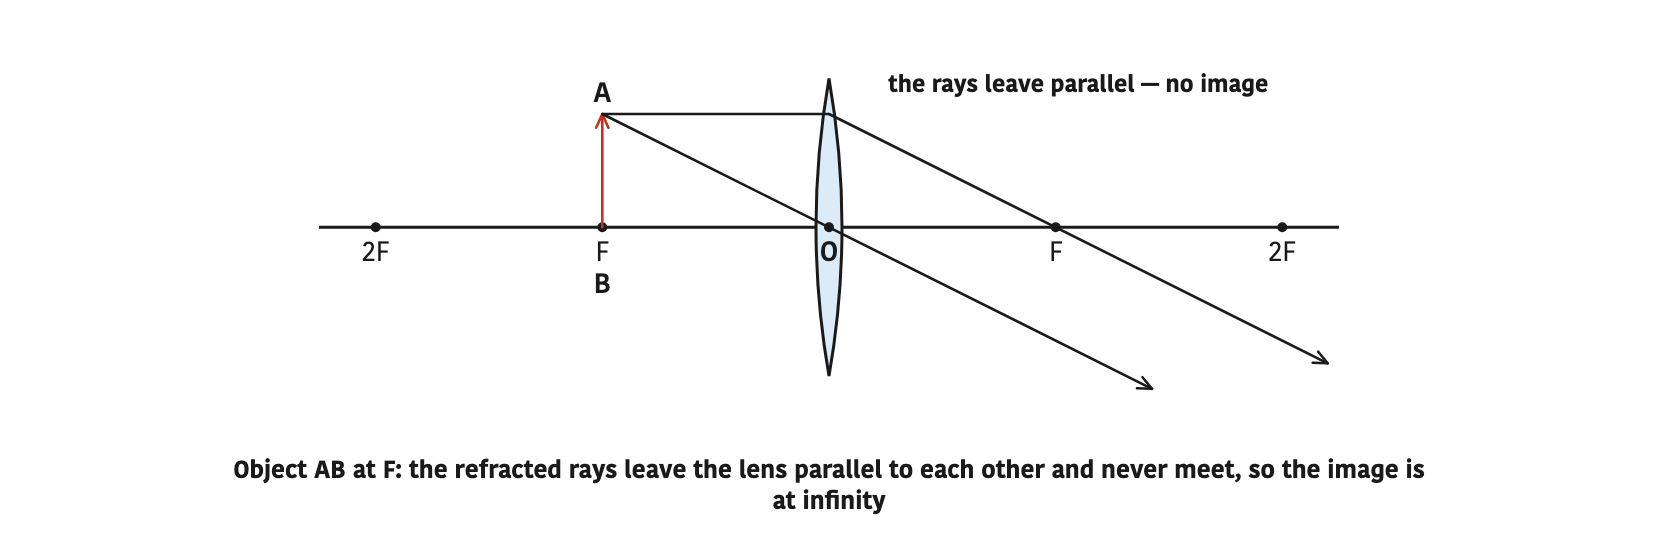
This arrangement is useful in a flashlight. The bulb is placed at the focus of the lens, so the light leaves the lens as a parallel beam that does not spread out and can reach a long distance.
Object Between F and O
This is the one position where a convex lens does not form a real image. With the object closer to the lens than F, the two refracted rays spread apart on the other side and never meet. Extended backwards as dotted lines, they meet on the same side as the object, behind it. The image is formed on the same side as the object, and it is virtual, erect and magnified.
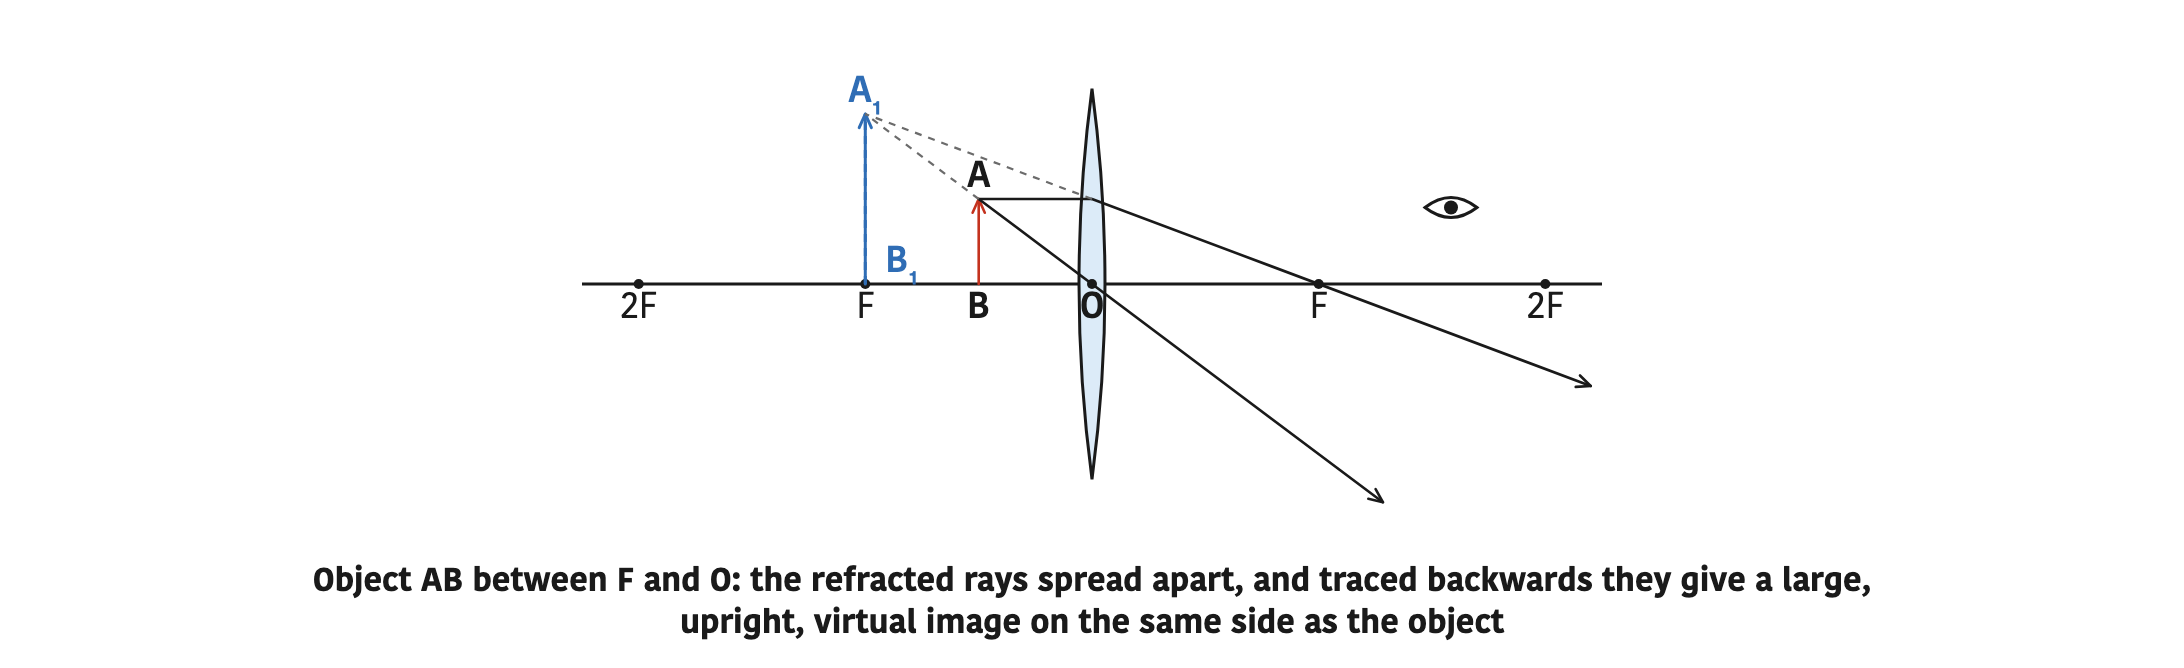
A hand lens, also called a magnifying glass, uses this position to enlarge small print or the leg of an insect. The lens is held so that the object is inside its focal length. The eye on the other side receives the spreading rays and sees a large, upright image. No screen can catch this image, because the rays never really meet there.
The Six Positions at a Glance
| Position of object | Position of image | Nature and size of image | Use |
| At infinity | At F | Real, inverted, highly diminished | Objective lens of a telescope |
| Beyond 2F | Between F and 2F | Real, inverted, diminished | Camera |
| At 2F | At 2F | Real, inverted, same size | Erecting lens of a terrestrial telescope |
| Between F and 2F | Beyond 2F | Real, inverted, magnified | Projector |
| At F | At infinity | Real, inverted, highly magnified | Flashlight |
| Between F and O | Same side as the object | Virtual, erect, magnified | Hand lens |
As the object is brought from far away towards the convex lens, its image grows larger and forms further from the lens. Moving the object away does the opposite: the image shrinks and comes back towards F.
Predicting the Image From Distances
Knowing the focal length is enough to predict the image without drawing. Suppose a convex lens has a focal length of 10 cm. Then F is 10 cm from O and 2F is 20 cm from O on each side. Compare each object distance with 10 cm and 20 cm:
- (a) Object 35 cm from the lens: 35 cm is more than 20 cm, so the object is beyond 2F. The image forms between 10 cm and 20 cm on the other side and is real, inverted and diminished.
- (b) Object 20 cm from the lens: the object is at 2F. The image forms 20 cm away on the other side and is real, inverted and the same size.
- (c) Object 14 cm from the lens: 14 cm lies between 10 cm and 20 cm, so the object is between F and 2F. The image forms more than 20 cm away on the other side and is real, inverted and magnified.
- (d) Object 10 cm from the lens: the object is at F. The refracted rays come out parallel and the image is at infinity.
- (e) Object 4 cm from the lens: 4 cm is less than 10 cm, so the object is between F and O. The image is on the same side as the object and is virtual, erect and magnified.
Image Formed by a Concave Lens
A concave lens behaves very differently. Rays passing through it bend away from the principal axis after refraction, so they spread apart and never cross each other. Extended backwards as dotted lines, they meet at a point on the same side as the object. The image forms there, between F and O. Because the rays only appear to come from that point, the image is virtual.
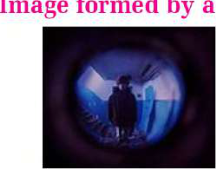
Wherever the object is placed in front of a concave lens, near or far, the image is always virtual, erect and diminished. The lens fitted in the peephole of a door uses this. Someone inside looking through the peephole sees the person standing outside as a small, upright image, and because the image is small, a wide area outside fits into view.
A convex lens can form a real or a virtual image depending on where the object is. A concave lens never forms a real image. Its image is always virtual, erect and diminished.
The full lesson is waiting for you
The notes are free to read in full. A free account opens the rest of the practice, and tracks your progress and confidence score for every subject. Presentations and videos need approval from Learn Yeti.