Catching an Image on a Sheet of Paper
Take a concave mirror and turn its shining side towards an open window. Hold a sheet of thick white paper in front of it so that the light coming back from the mirror falls on the paper. At first you see only a patch of brightness on it. But slide the paper or the mirror slowly forwards and backwards, and at one position the trees, the buildings and the sky outside the window appear on the paper as a small, clear picture. That little picture is upside down.
- Take a concave mirror and turn it towards an open window.
- Hold a sheet of thick white paper in front of the mirror, about 20 cm to 30 cm away.
- Let the rays reflected from the mirror fall on that paper.
- Move the mirror or the paper a little at a time until the picture of the things outside becomes sharp on the paper.
- When the picture is at its sharpest, measure the distance between the paper and the mirror.
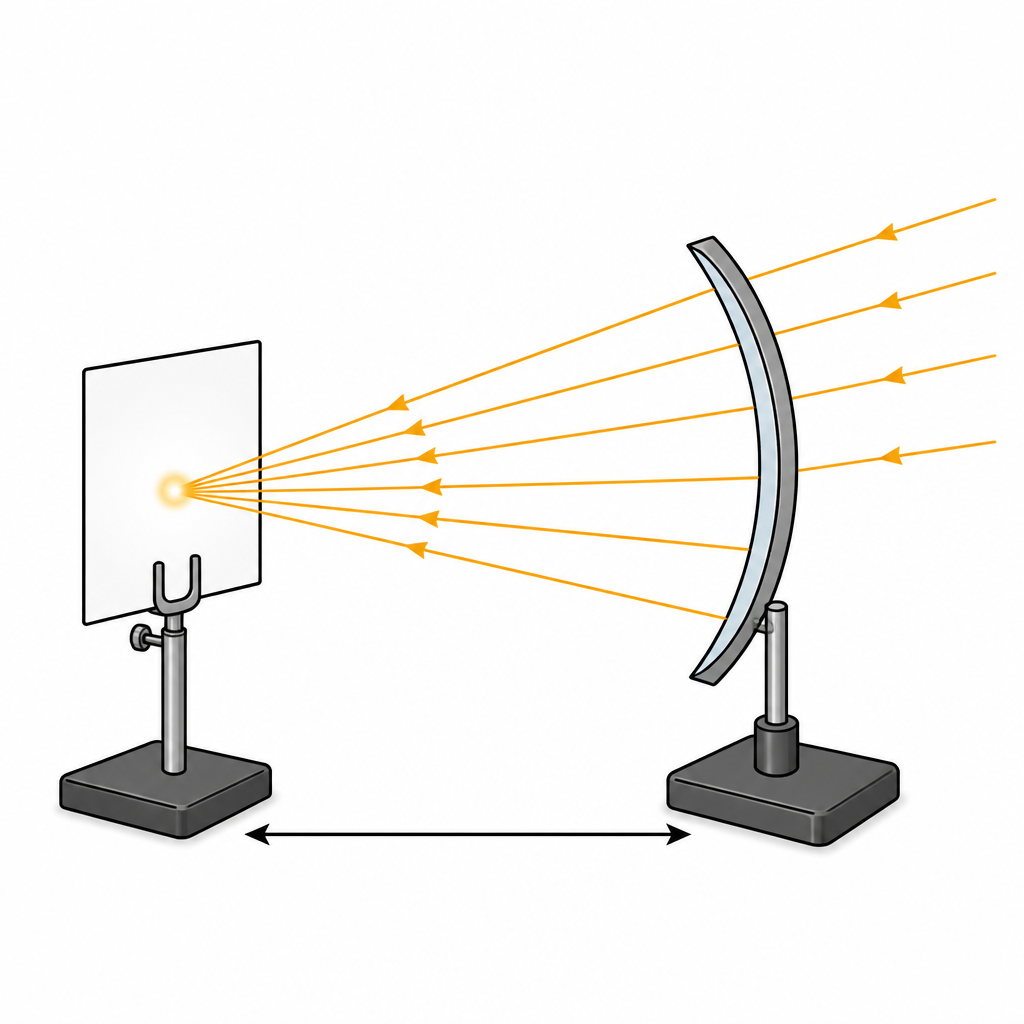
The distance you have just measured is the focal length of the mirror. The things outside the window are very far away, so the light from them reaches the mirror as a nearly parallel beam and, after reflection, gathers at the focus. The picture is sharp only when the paper is standing exactly there, so the distance from the paper to the mirror is the focal length.
Focal length: the distance between the mirror and the screen when the image of a very distant object is at its sharpest on the screen.
Now do the same thing with a convex mirror and then with a plane mirror in place of the concave one. However far you slide the paper, no picture of the outside world settles on it. Yet if you look into either mirror you see an image perfectly well. So being able to see an image and being able to catch it on paper are two different things.
Do not turn a concave mirror straight at the sun. It gathers sunlight into one tiny spot that is hot enough to scorch paper, and you must never look closely at that bright spot.
What a Real Image Is
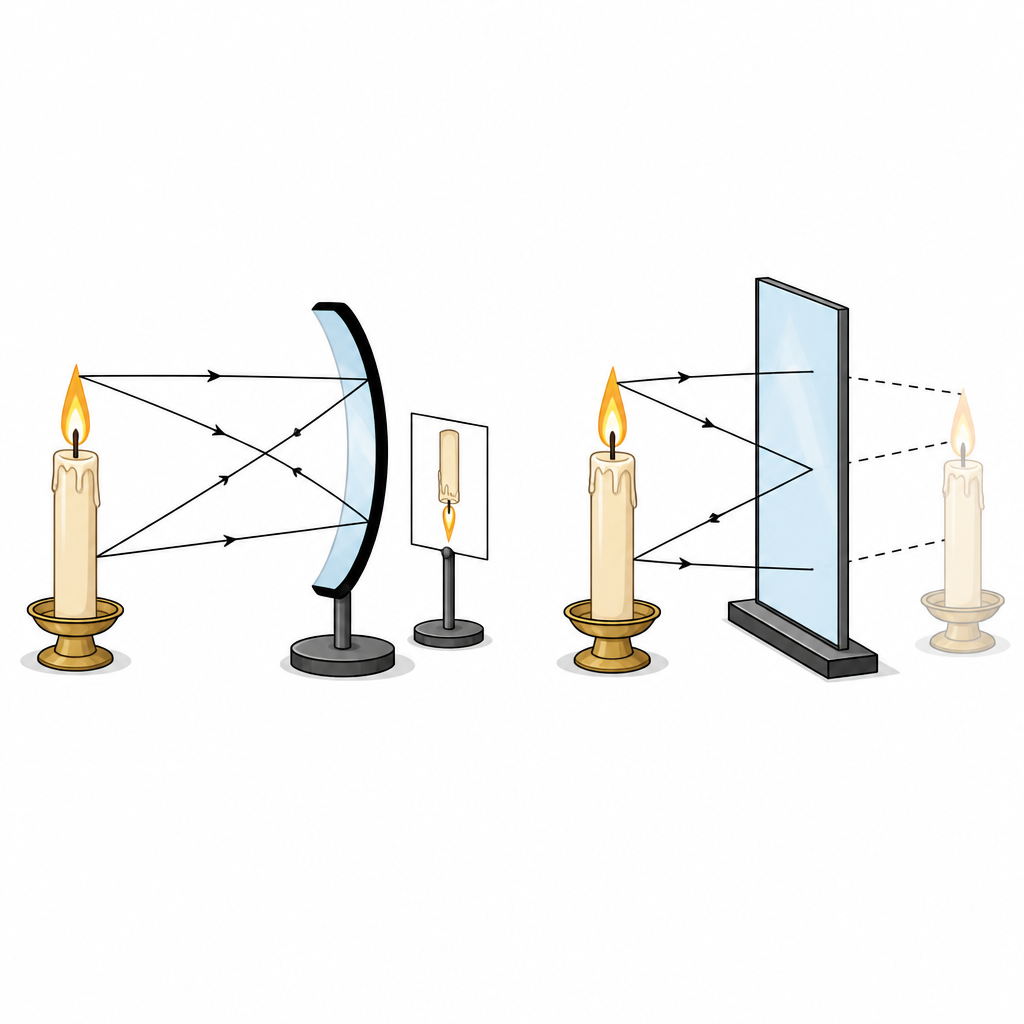
An image that can be taken onto a screen is called a real image. It forms where the reflected rays actually cross one another and meet.
That is why a picture appears on the paper. The rays turned back by the mirror really do gather at one point, and light actually arrives there. Put paper at that place and the image sits on it. A real image always forms in front of the mirror, because the light travels forwards after reflection. It is always inverted, because the light from the top of the object crosses over and ends up below, while the light from the foot ends up above. Of the three kinds of mirror, only a concave mirror can form a real image. A convex mirror and a plane mirror cannot.
What a Virtual Image Is
An image that cannot be taken onto a screen is called a virtual image. It forms where the reflected rays only appear to have crossed. In truth those rays never meet at all.
The face you see in a plane mirror is an image of this kind. The rays come back from the mirror spreading out and enter your eye. Your eye traces them straight backwards and judges that they started from a point behind the mirror. No light ever reaches that point, so a sheet of paper held behind the mirror catches nothing. A virtual image always forms behind the mirror and is erect, that is, the right way up. The image in a convex mirror, of the kind fixed at a shop door or used as a vehicle side mirror, is virtual in just the same way.
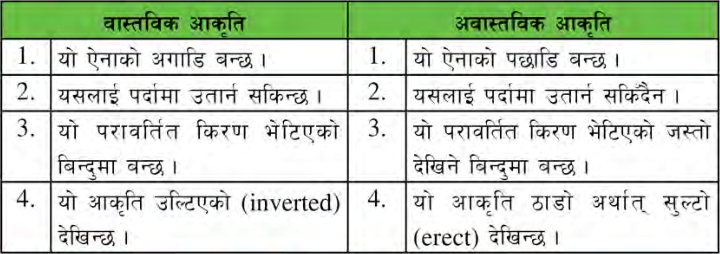
Difference Between Real Image and Virtual Image
| Real image | Virtual image |
| It forms in front of the mirror. | It forms behind the mirror. |
| It can be taken onto a screen. | It cannot be taken onto a screen. |
| It forms at the point where the reflected rays actually meet. | It forms at the point where the reflected rays only appear to meet. |
| The image looks inverted. | The image looks erect, that is, the right way up. |
Drawing a Ray Diagram for a Concave Mirror
Where the image forms, how big it is and what kind it is can all be worked out on paper. For that you need a compass, a ruler and a sharp pencil. First you set up the mirror, then you place the object, and finally you apply the rules of reflection and draw the rays.
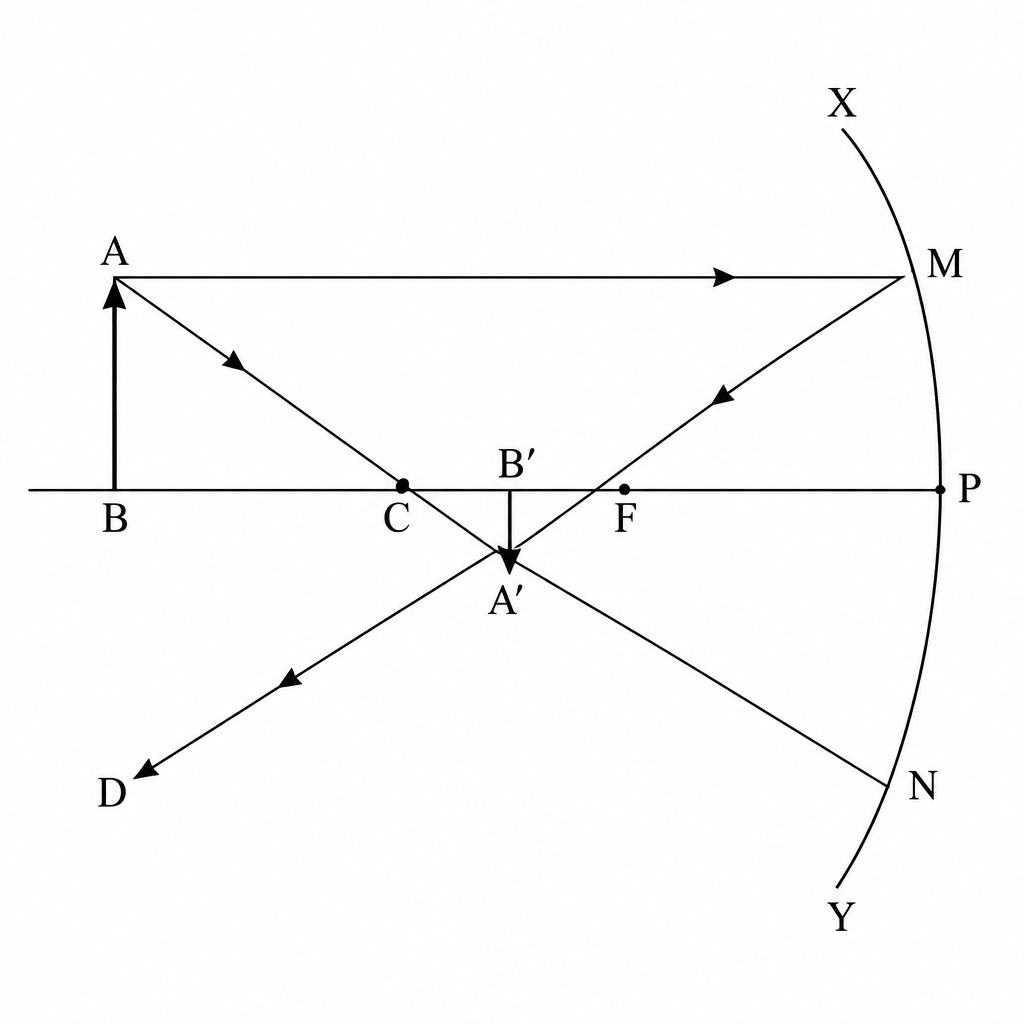
- With a compass, draw a circular arc XY. This arc stands for the concave mirror.
- Mark the point where the compass needle stood as C. This is the centre of curvature.
- Mark the midpoint of the arc XY as P. This is the pole of the mirror.
- Draw a straight line joining P and C, and continue it to the left. This line is the principal axis.
- Shade the outer side of the arc XY, so that it is clear which surface is the reflecting one.
- Find the midpoint of CP and label it F. This is the focus of the mirror.
- Stand the object at the chosen point on the principal axis. Here place it beyond C and call it AB, drawing it as an upright arrow with its foot B on the axis and its tip A above the axis.
Using the Rules of Reflection to Find the Image
Now apply the rules that light obeys when it is reflected from a concave mirror. Two rays leaving the tip A of the object are enough.
- From the point A draw the line AM parallel to the principal axis. M is the point where this ray strikes the mirror.
- Join M to F with a straight line and continue it beyond F as far as D. A ray that arrives parallel to the axis passes through the focus after reflection.
- From A draw the line AN passing through C, so that it meets the mirror at N. A ray aimed at the centre of curvature strikes the mirror straight on, so it comes back from N along the very same path through C. This returning line cuts the line MF at the point A prime.
- From A prime draw A prime B prime perpendicular to the principal axis, meeting the axis at B prime. This A prime B prime is the image of the object AB.
- Measure the size and the position of A prime B prime. It is smaller than the object, inverted and real, and it lies between F and C.
Wherever two reflected rays that left the same point of the object meet again, that meeting point is the image of that point. Two rays are always enough.
Never draw a ray behind the mirror as a solid line. Light does not go behind the mirror, so a line continued back there is always drawn as a dashed line. Those dashes are the mark of a virtual image.
Position, Size and Nature of the Image
Once the ray diagram is complete, three things have to be said about the image. All three are read off the diagram itself, by measuring or by looking, never by guessing.
Position: see where A prime B prime has formed. For an object placed beyond C, the image lies between F and C.
Size: measure A prime B prime and AB and compare them. Here the image is smaller than the object.
Nature: the image is inverted and the reflected rays have really met, so it is a real image.
The diagram can also be checked on a screen. Set up a real concave mirror and a real object in the same arrangement, hold a white card between F and C, and a small upside down picture of the object appears on it. What the drawing predicts is exactly what the experiment shows.
The full lesson is waiting for you
The notes are free to read in full. A free account opens the rest of the practice, and tracks your progress and confidence score for every subject. Presentations and videos need approval from Learn Yeti.