Pranayama: Breathing with Control
All day long we breathe without giving it a thought. In yoga, breathing is also something we practise on purpose. Pranayama is the practice of controlling the breath: how deeply we breathe in, how long we hold it, and how we let it go. The name joins two ideas. Prana is the breath that keeps us alive, and ayama means stretching it out or keeping it under control. Pranayama is always done sitting still in a steady meditation posture, with the back and neck straight.
Pranayama: the yoga practice of controlling, on purpose, the way we breathe in, hold the breath and breathe out.
One round of breathing has three parts, and yoga gives each part its own name. These names appear again and again when a breathing practice is described, so it helps to know them first.
Puraka, Kumbhaka and Rechaka: Puraka is breathing in. Kumbhaka is holding the breath for a while. Rechaka is breathing out.
Two kinds of pranayama are taught here. The first is Bhastrika, in which both breathing in and breathing out are done with force. The second is Kapalbhati, in which the whole effort goes into breathing out.
Bhastrika Pranayama
Picture the bellows in a blacksmith's workshop. Each push draws air in hard and then drives it out just as hard. The word Bhastrika means bellows, and in this pranayama your chest works in exactly that way.
Bhastrika Pranayama: sitting in any comfortable meditation posture, drawing the breath in through both nostrils with full force all the way down to the diaphragm, and then pushing it out again with the same force.
The diaphragm is a dome-shaped sheet of muscle just below the lungs. It separates the chest from the belly. When the breath is drawn down as far as the diaphragm, the lungs fill completely. In Bhastrika only the chest swells as you breathe in. The belly does not swell.
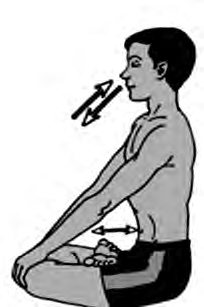
Bhastrika is never started at full speed. A healthy person, or someone who already practises pranayama, raises the pace gradually: slow first, then medium, and only then fast. The practice lasts 5 to 10 minutes.
A person whose heart or lungs are weak should do this pranayama only at a slow pace, breathing in gently. They should not move on to the fast pace.
How Bhastrika Is Done
Follow these steps in order when you practise.
- Sit in any comfortable meditation posture with your back and neck straight.
- Draw the breath in through both nostrils with full force, down as far as the diaphragm.
- Let only your chest swell as the air comes in. Keep the belly flat.
- Push the breath out through both nostrils with the same force.
- Begin at a slow pace. As your practice grows, move to a medium pace and then a fast one.
- Continue in this way for 5 to 10 minutes.
Puffing out the belly while breathing in is wrong. The breath is drawn only as far as the diaphragm, so the belly stays flat and only the chest rises.
Bhastrika trains the mind as well as the body. As you fill yourself with breath, hold this thought: all the good things in the universe, its strength, energy, purity, peace and joy, are entering my body together with the breath.
When the nose is blocked: if both nostrils are not properly open because of too much mucus or a sinus problem, first close the right nostril and breathe in through the left one, at a slow, medium or fast pace as far as you are able.
Benefits of Bhastrika
Practised regularly, Bhastrika helps the body and the mind in these ways:
- It helps in curing colds and coughs, allergies, breathing illnesses, asthma and sinus trouble. The lungs grow strong, and the heart and brain benefit from receiving pure oxygen.
- It is useful for problems of the throat such as thyroid trouble and tonsils.
- The blood is purified and poisonous waste is removed from the body.
- The mind stays steady.
Kapalbhati Pranayama
Kapal means the forehead and bhati means shining. Kapalbhati differs from Bhastrika in one clear way: no effort at all is put into breathing in.
Kapalbhati Pranayama: a pranayama in which attention is given only to pushing the breath out with force, and no attempt is made to breathe in.
Each time, the breath is thrown out through the nose in one sharp push. The air then comes back in on its own, without being pulled. Kapalbhati is done for at least 5 minutes, and it can be done for longer.
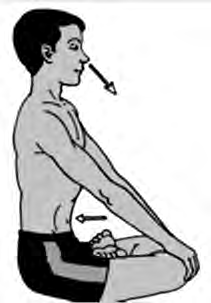
Trying to pull the breath in hard during Kapalbhati is wrong. Force is used only to push the breath out. The breath comes back in by itself.
While doing Kapalbhati, hold this thought: with every breath I throw out, all the illnesses of my body are leaving along with it. Imagining the illnesses being destroyed as the breath goes out brings a special benefit of its own.
Benefits of Kapalbhati
- The mind and the face gain brightness and beauty.
- It is especially helpful in diseases of the heart, lungs and brain.
- It helps with obesity, diabetes, constipation, and kidney and prostate diseases.
- The mind stays steady, calm and cheerful.
- It gives special benefit in diseases of the stomach, liver and kidneys.
Bhastrika and Kapalbhati Side by Side
Both practices involve breathing hard through the nose, so they are easy to confuse. The table below sets out how they differ.
| Point | Bhastrika | Kapalbhati |
| Main effort | Both breathing in and breathing out | Only breathing out |
| Breathing in | Forceful, down to the diaphragm | No effort; the air returns by itself |
| Time | 5 to 10 minutes | At least 5 minutes, and it may be longer |
| Thought held in mind | The good energy of the universe is entering the body | Illnesses are leaving the body with the breath |
Meditation: Holding the Mind Still
Pranayama steadies the breath, and meditation steadies the mind. In meditation the mind is not allowed to wander. It is held on one thing. Two methods follow. In Nabhi Chaitanya Dhyan the attention rests on the navel, and in Bindu-kendrit Dhyan the eyes rest on one fixed point.
Nabhi Chaitanya Dhyan
Nabhi Chaitanya Dhyan: a method of meditation practised to increase one's energy.
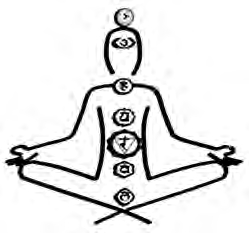
Nabhi means the navel, and chaitanya means awareness, so the name says what the practice is: awareness held on the navel. It is done at bedtime, and the whole attention rests on the navel centre.
Method:
- Ten minutes before going to sleep, sit up on your bed.
- Let your breathing stay normal. Do not try to change it.
- Lie down slowly, so that you stay in this relaxed state for 5 to 10 minutes. Your breathing must not change as you lie down.
- Bring your whole attention to the navel centre.
- Stay like this for about 15 to 20 minutes.
Benefits of Nabhi Chaitanya Dhyan
The source of the body's energy is hidden in the navel centre, and meditating on it brings that energy out. That is why the benefits of this meditation are about energy and the ability to work:
- Regular practice builds up energy in the body.
- You become better able to finish your work with full concentration.
- You do not feel weak for the next 24 hours.
Bindu-kendrit Dhyan
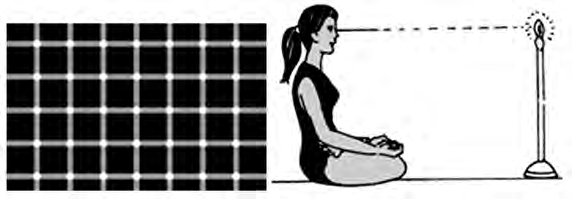
Bindu-kendrit Dhyan: sitting in a meditation posture and gazing steadily at one fixed object without blinking.
Bindu means a point and kendrit means centred on it. The flame of a ghee lamp is considered the best object for this meditation, because it helps the mind become concentrated and steady. A small, still flame gives the eyes one clear place to rest.
Where and when: to sink deeply into this meditation at night, choose a quiet, private, slightly dark room where insects do not come in. It can also be done in the morning, once you have finished your asanas and pranayama.
How Bindu-kendrit Dhyan Is Done
- Light a lamp and place it 2 to 3 metres from where you sit, exactly at the level of your eyes.
- Sit in whatever posture is comfortable for you.
- Rest both hands lightly on your knees or in your lap.
- Close your eyes and settle your mind, the way you prepare yourself before any meditation.
- Then gaze steadily at the flame for 5 or 10 minutes, or for as long as you can.
Benefits of Bindu-kendrit Dhyan
When Bindu-kendrit Dhyan is practised regularly, the person practising it gains these benefits:
- The eyes become very bright, clear, shining and attractive.
- Eyesight improves, and eye diseases are helped.
- The mind stays focused, steady and cheerful.
Other Practices from Class 9
Some yoga practices were learnt and practised in class 9. They are to be practised again this year in the same way:
- Agnisar Kriya
- Jalneti Kriya
- Yoga Nidra
- Kapalbhati
Their methods were learnt last year. Now they simply join Bhastrika, Kapalbhati and the two meditations as part of your regular practice.
The full lesson is waiting for you
The notes are free to read in full. A free account opens the rest of the practice, and tracks your progress and confidence score for every subject. Presentations and videos need approval from Learn Yeti.