Learning Through Sound and Moving Pictures
Much of what we learn today reaches us as sound and video. A teacher's recorded explanation, a science experiment shown on video, a programme about a historical event that we listen to: all of these are learning materials. Some of them we only hear, and some we both hear and see. The Internet holds a great many of them. For example, the channel youtube.com/c/NCEDVirtual carries audio-visual lessons on different school subjects. While searching for and watching such material, stay careful about your digital well-being, so that looking for a lesson does not turn into hours of unplanned screen time.
You do not have to rely only on what other people have made. With a phone and a computer you can record sound and video yourself, trim it, join it, and turn it into learning material for yourself and your classmates.
Audio content: material made of recorded sound only, such as a recorded explanation or a song. It is created by recording sound with the microphone of a computer or a smartphone.
Audio-visual content: material that carries both sound and moving pictures, in other words a video. It is created from camera recordings made with a smartphone camera or a digital camera.
Recording Audio and Video
Every smartphone has a microphone, and most laptops have one built in. Open a voice recorder app on the phone, or a sound recording program on the computer, and speak: your voice is saved as an audio file. For video, the phone's camera or a digital camera records pictures and sound together. A good recording saves a lot of editing later, so these habits help:
- Record sound in a quiet room, so that background noise does not cover your voice.
- Rest the phone on a table or a stand so the picture does not shake.
- Keep the light falling on your subject, not a bright window behind it.
- Video files are large, so check that the phone has enough free storage before you start.
Recording a Falling Spring Balance in Slow Motion
A video can show events that happen too fast for the eye. Picture an object of mass 500 g hanging from a spring balance. While you hold the balance still, its pointer shows the mass pulling down on the spring. Now the balance, with the mass still hanging from it, is released from a height, and at that very moment a friend records it on a phone in slow motion. Slow motion captures a short event in a great many frames, so when it is played back the event moves slowly.
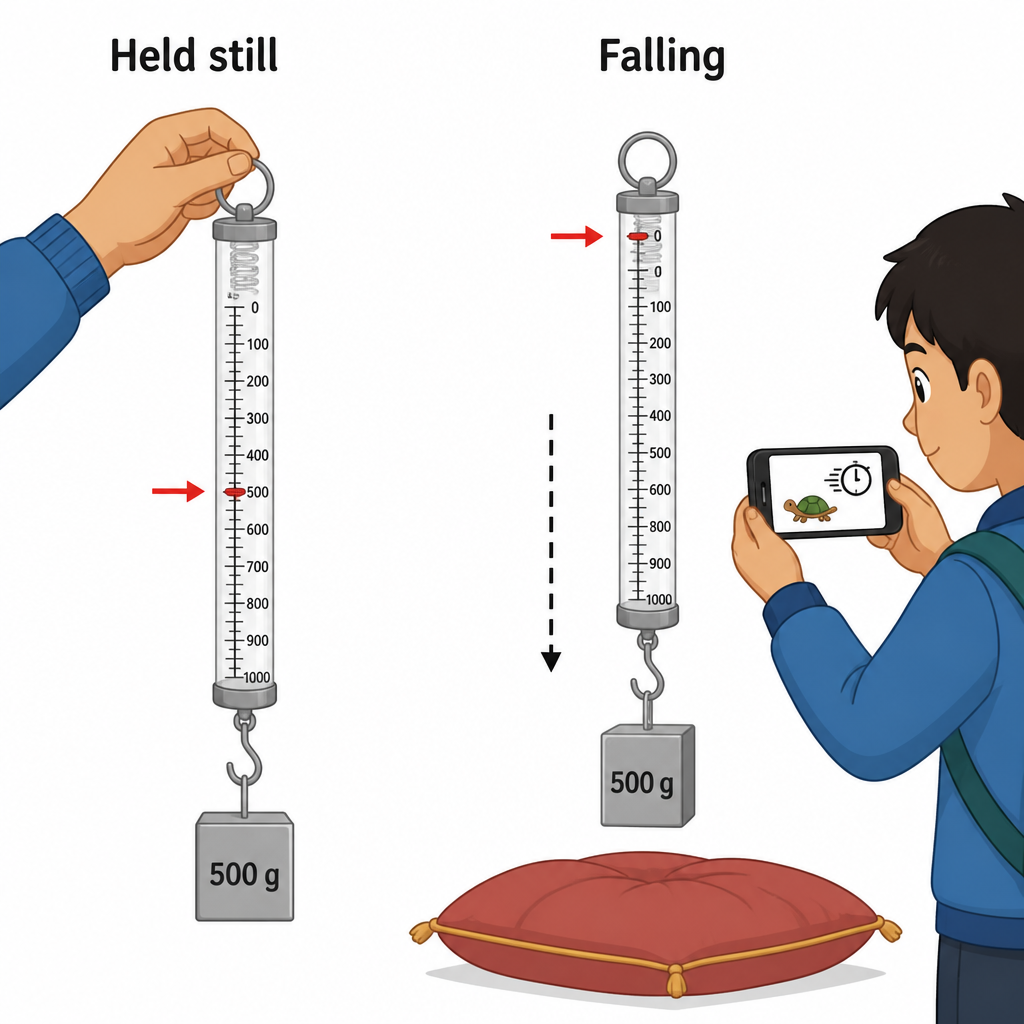
Played back slowly, the video lets you study the pointer frame by frame. As soon as the balance begins to fall freely, the pointer moves back towards zero. The balance and the mass fall together with the same acceleration, so the mass no longer pulls down on the spring. This is the weightlessness of free fall. Without slow motion the whole drop is over before anyone can read the pointer.
Slow-motion recording spreads a quick event over many frames, so a change that lasts less than a second can be studied carefully.
Let the balance land on a cushion or a folded blanket. Keep feet and the phone clear of the path of the falling mass.
Video File Formats
When a recording is saved, the device gives the file a name and adds a few letters after a dot at the end. In a file called Class 10 ICT.mp4, Class 10 ICT is the name and mp4 is the extension. The extension tells the computer what kind of file it is and which program can open it.
File extension: the letters after the dot at the end of a file name, which show the file's format, for example .mp4 or .mp3.
MP4 is the most widely used video format. 3GP, SVI and MOV are also video file formats. Files that hold only sound have formats of their own: MP3, WAV and WMA.
| Kind of file | Formats | What it holds |
| Video (audio-visual) | MP4, 3GP, SVI, MOV | Pictures and sound |
| Audio | MP3, WAV, WMA | Sound only |
MP4 and MP3 differ by a single digit. MP4 is a video format; MP3 is an audio format.
What Video Editing Means
A raw recording is rarely perfect. There may be a few seconds of fumbling with the phone at the start, a moment when someone walked in front of the camera, or a long silence at the end. Editing fixes this. A segment that was recorded unnecessarily can be cut out, and several short clips can be combined to form a single video file.
Video editing: changing a recorded video, for example by cutting out an unnecessary segment or combining two or more clips into a single video file.
Editing needs a mobile application or computer software. Some examples used on a computer:
- Adobe Premiere Pro: software used by professional video makers.
- Filmora: video editing software that is easy to learn.
- The Windows Video Editor: comes with the computer's system software and is enough for simple cutting and joining.
Cutting a Video on a Computer
Cutting a video, also called trimming, means keeping only the part you need. Suppose your spring-balance video is four and a half minutes long but the useful part is only about one minute. First copy the video from the phone to the computer. Then work through these steps in the Windows Video Editor. The first job is to open a new project:
Trim: to keep only the chosen part of a video, between a start point and an end point, and remove the rest.
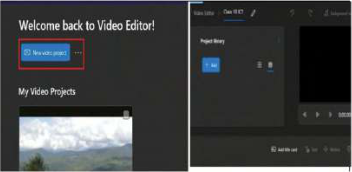
- Step 1: Click the search bar, type Video Editor and open it.
- Step 2: Click New video project.
- Step 3: Type a name for the project, for example Class 10 ICT, and click OK.
Next, bring the video into the project and open the cutting tool:
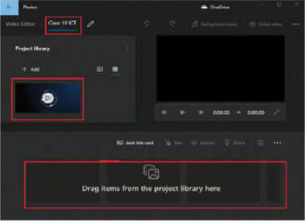
- Step 4: Click Add in the project library and select the video from the computer's memory.
- Step 5: Drag the video from the project library down into the editing panel.
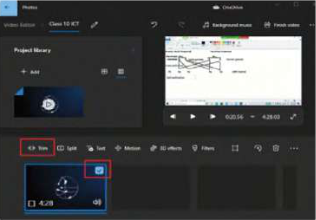
- Step 6: Select the video in the editing panel and click Trim.
Then choose the part to keep:
- Step 7: Play the video to find where the useful part starts and ends.
- Step 8: Move the two blue drag bars under the video to separate the start time and the end time.
- Step 9: Check the clip length shown on the right, then click Done.
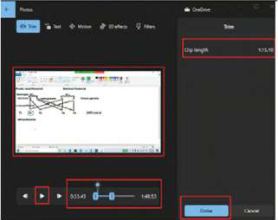
Finally, save the shortened clip:
- Step 10: Select the cut clip in the editing panel and click Finish video.
- Step 11: Click Export in the window that appears.
- Step 12: Choose a place on the computer to save it, such as the Desktop, type the file name and click Export.
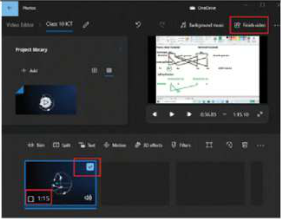
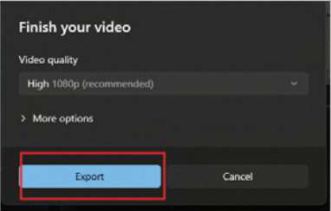
Trimming inside the Video Editor does not damage the original recording. The shorter video is saved as a new file when you export it.
Joining Clips into One Video
Suppose different groups in the class have each cut one clip: one shows the spring balance hanging still, one shows it falling, and one explains the result. To join the three into one video:
- Step 1: Copy the clips cut and prepared by all your friends into a single folder on the computer.
- Step 2: Open the video editing software and start a new project.
- Step 3: Select the clips from the folder and add them to the project library.
- Step 4: Select all the clips and drag them to the editing panel.
- Step 5: Arrange the clips in the order they should play.
- Step 6: Select all the clips to be joined in the editing panel and click Finish video.
- Step 7: Click Export and choose where to save the file, such as the Desktop, exactly as you saved the cut clip.
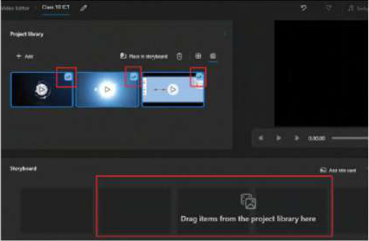
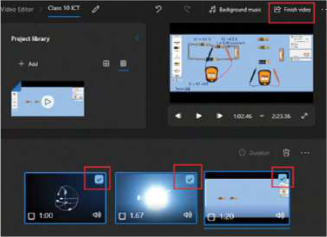
The finished video plays the clips in the order they sit in the editing panel, from left to right. Check the order before you export.
Editing on a Smartphone
Editing is not limited to computers. Smartphones have a separate editing application. Open the video recorded by the camera from the phone's gallery and tap it: an edit icon appears. Tapping that icon shows the cut and crop tools. Cutting makes the video shorter in time. Cropping keeps the same length but trims away unwanted edges of the picture.
If there is no video editing application on the phone, the required application can be downloaded from the Play Store. It is then installed on the phone by tapping it at the place where it was downloaded.
Editing Audio
Just like video, an audio file can be edited. A long recording can be shortened, a cough or a long silence in the middle can be removed, or two recordings can be joined. The file extensions of audio files are MP3, WAV, WMA and so on. If the software or application needed for audio editing is not installed on the computer or smartphone, it can be downloaded and installed from the Windows Store, the App Store and similar places.
- Audacity: software for editing audio, downloaded from its official website, audacityteam.org.
- MP3 cutter: software for cutting MP3 files, found through a Google search and downloaded from an official source.
Download software and apps only from the official website or an official store. Files from unknown websites can carry viruses.
Planning a Short Learning Video
Recording, cutting and joining together let you make a learning video of your own. A good video begins with a plan, before anything is recorded:
- Choose one topic from a unit and write in one sentence what the video will teach.
- Divide the video into parts and give each part a time.
- Write a short script of what will be said and collect the materials for any demonstration.
- Record each part as a separate clip.
- Trim each clip, join them all in order and export the video.
- Finally, watch the whole video to check its timing and order.
If a 5-minute video must become a 3-minute one, editing removes long pauses and repeated sentences, trims every part, and protects the main demonstration. Here is one example:
| Part | In the 5-minute video | In the 3-minute video |
| Introduction | 30 seconds | 15 seconds |
| Explanation | 2 minutes | 1 minute 15 seconds |
| Demonstration | 1 minute 30 seconds | 1 minute |
| Summary | 1 minute | 30 seconds |
| Total | 5 minutes | 3 minutes |
The full lesson is waiting for you
The notes are free to read in full. A free account opens the rest of the practice, and tracks your progress and confidence score for every subject. Presentations and videos need approval from Learn Yeti.