Two Transformations, One After Another
A point can be moved by one transformation, and then its image can be moved again by a second transformation. Take the point A(4, 2). Reflecting it in the line \( y = x \) swaps its two coordinates, so its image is A'(2, 4).
Now turn A'(2, 4) through 90° about the origin O in the anticlockwise direction. Anticlockwise is called the positive direction, so this is a rotation of +90°. The rule for it sends \( (x, y) \) to \( (-y, x) \), so A'(2, 4) lands on A''(-4, 2).
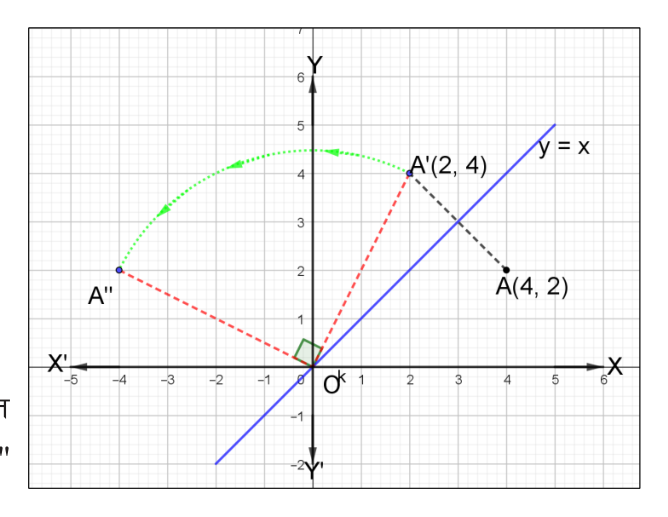
Compare the starting point A(4, 2) with the final image A''(-4, 2). The y-coordinate has not changed. The x-coordinate has only changed its sign. That is exactly what a reflection in the Y-axis does. So two moves made one after the other have the same overall effect as one single move.
Combined transformation: one transformation applied to an object, followed by a second transformation applied to the image the first one produced. The second transformation always acts on the first image, never on the original object.
The Notation GoF and FoG
Let F and G stand for two different transformations. A combined transformation is written with a small letter o between them, as GoF or FoG. The letter written on the right, nearest the object, is the one that acts first.
GoF: first transform the object by F, then transform the image obtained by G to get the final image.
FoG: first transform the object by G, then transform the image obtained by F to get the final image.
\[ \text{GoF}(x, y) = G[F(x, y)] \]
This works just like a composite function. The inner bracket \( F(x, y) \) is worked out first, and then G is applied to that answer.
Do not read GoF from left to right. In GoF the transformation F is done first, even though G is written first. Think of it as G[F(x, y)]: the inside is always worked out first.
Single equivalent transformation: the one transformation that takes the original object straight to the final image of a combined transformation. It is found by studying the coordinates of the starting point and of the final image, and seeing how they are related.
Rules You Will Combine
Every combined transformation is built from single transformations. Keep these rules beside you while you work. A rotation of +90° is anticlockwise and a rotation of -90° is clockwise.
| Transformation | Image of P(x, y) |
| Translation by \( T = \begin{pmatrix} a \\ b \end{pmatrix} \) | \( (x + a, \; y + b) \) |
| Reflection in the X-axis (y = 0) | \( (x, \; -y) \) |
| Reflection in the Y-axis (x = 0) | \( (-x, \; y) \) |
| Reflection in y = x | \( (y, \; x) \) |
| Reflection in y = -x | \( (-y, \; -x) \) |
| Reflection in x = h | \( (2h - x, \; y) \) |
| Reflection in y = k | \( (x, \; 2k - y) \) |
| Rotation +90° about O | \( (-y, \; x) \) |
| Rotation -90° about O | \( (y, \; -x) \) |
| Rotation 180° about O | \( (-x, \; -y) \) |
| Rotation +90° about (a, b) | \( (-(y - b) + a, \; (x - a) + b) \) |
| Rotation -90° about (a, b) | \( ((y - b) + a, \; -(x - a) + b) \) |
| Enlargement E[(a, b), k] | \( (k(x - a) + a, \; k(y - b) + b) \) |
Finding the Single Equivalent Transformation
Testing one point shows what happens to that point. To be sure about every point, follow a general point P(x, y) through both transformations. The final coordinates, written in x and y, tell you which single transformation it is.
Worked example: P(x, y) is reflected in the X-axis, and the image is rotated through +90° about the origin. Find the single equivalent transformation.
Step 1: Reflecting P(x, y) in the X-axis changes the sign of y:
\[ P(x, y) \xrightarrow{y = 0} P'(x, -y) \]
Step 2: Rotating P'(x, -y) through +90° about O. The rule turns a pair (first, second) into (minus second, first), so (x, -y) becomes:
\[ P'(x, -y) \xrightarrow{+90^\circ} P''(y, x) \]
Step 3: Comparing the start with the end, the two coordinates have simply swapped places:
\[ P(x, y) \to P''(y, x) \]
Swapping the coordinates is the rule for reflection in the line \( y = x \). So a reflection in the X-axis followed by a rotation of +90° about O is the same as a single reflection in the line \( y = x \). In the same way, the opening example gives \( (x, y) \to (y, x) \to (-x, y) \), which is a reflection in the Y-axis.
To name the single equivalent transformation, follow P(x, y) through both rules, write the final image in terms of x and y, and match it with a rule you know.
The Order Makes a Difference
Take A(4, 2) again. This time do the rotation first and the reflection second.
Step 1: Rotating A(4, 2) through +90° about O, using \( (x, y) \to (-y, x) \):
\[ A(4, 2) \xrightarrow{+90^\circ} A'(-2, 4) \]
Step 2: Reflecting A'(-2, 4) in the line y = x, which swaps the coordinates:
\[ A'(-2, 4) \xrightarrow{y = x} A''(4, -2) \]
Reflecting first and rotating second gave A''(-4, 2), a reflection in the Y-axis. Rotating first and reflecting second gives A''(4, -2), a reflection in the X-axis. The same two transformations in a different order have produced a different final image.
In general \( \text{GoF} \neq \text{FoG} \). Always carry out the transformations in the order the question gives.
Worked Example 1: Translation Followed by Reflection
Triangle ABC has vertices A(1, 0), B(2, 1) and C(3, -1). It is translated by the vector \( T = \begin{pmatrix} 1 \\ 2 \end{pmatrix} \), and the image is then reflected in the line x = 2. Find the final image ΔA''B''C'' and show it with ΔABC on one graph.
Step 1: Translation by (1, 2) adds 1 to x and 2 to y, so the rule is:
\[ P(x, y) \xrightarrow{T} P'(x + 1, y + 2) \]
Step 2: Applying this rule to each vertex:
\[ A(1, 0) \to A'(1 + 1, 0 + 2) = A'(2, 2) \]
\[ B(2, 1) \to B'(2 + 1, 1 + 2) = B'(3, 3) \]
\[ C(3, -1) \to C'(3 + 1, -1 + 2) = C'(4, 1) \]
Step 3: Reflection in x = h sends (x, y) to (2h - x, y). Here h = 2, so 2h = 4 and the rule is:
\[ P'(x, y) \xrightarrow{x = 2} P''(4 - x, y) \]
Step 4: Subtracting each x-coordinate of ΔA'B'C' from 4 and keeping y:
\[ A'(2, 2) \to A''(4 - 2, 2) = A''(2, 2) \]
\[ B'(3, 3) \to B''(4 - 3, 3) = B''(1, 3) \]
\[ C'(4, 1) \to C''(4 - 4, 1) = C''(0, 1) \]
The final image has vertices A''(2, 2), B''(1, 3) and C''(0, 1). A' lies on the mirror line x = 2 itself, so reflecting it leaves it where it is.
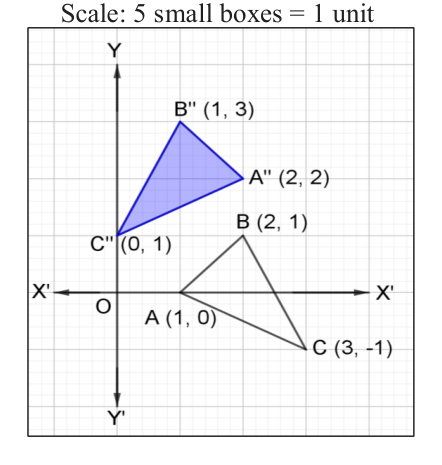
The two rules can also be joined into one: \( (x, y) \to (x + 1, y + 2) \to (4 - (x + 1), y + 2) \), which simplifies to \( (3 - x, y + 2) \). Check it with A(1, 0): \( (3 - 1, 0 + 2) = (2, 2) \), which is A''.
Worked Example 2: Reflection Followed by Enlargement
E is the enlargement with centre (-3, -4) and scale factor 2, and R is the reflection in the line y = 0. Triangle ABC has vertices A(2, 0), B(3, 1) and C(1, 1). The question has two parts:
- (a) To which point does the combined transformation EoR send P(x, y)?
- (b) Transform ΔABC by EoR, and show ΔABC and its image ΔA'B'C' on one graph.
In EoR the letter R is on the right, so the reflection R is done first and the enlargement E second.
Step 1: The rule for R, reflection in y = 0:
\[ P(x, y) \xrightarrow{y = 0} P'(x, -y) \]
Step 2: The rule for E, with (a, b) = (-3, -4) and k = 2:
\[ E(x, y) = (2(x + 3) - 3, \; 2(y + 4) - 4) \]
Step 3: Writing EoR as E acting on the result of R:
\[ \text{EoR}(x, y) = E[R(x, y)] = E(x, -y) \]
Step 4: Putting -y in place of y in the rule for E:
\[ E(x, -y) = (2(x + 3) - 3, \; 2(-y + 4) - 4) \]
Step 5: Expanding the brackets:
\[ = (2x + 6 - 3, \; -2y + 8 - 4) \]
Step 6: Collecting the numbers:
\[ = (2x + 3, \; -2y + 4) \]
So EoR sends P(x, y) to P'(2x + 3, -2y + 4). That answers part (a). For part (b), put the coordinates of each vertex into this one rule.
Step 7: For A(2, 0), with x = 2 and y = 0:
\[ A'(2 \times 2 + 3, \; -2 \times 0 + 4) = A'(7, 4) \]
Step 8: For B(3, 1), with x = 3 and y = 1:
\[ B'(2 \times 3 + 3, \; -2 \times 1 + 4) = B'(9, 2) \]
Step 9: For C(1, 1), with x = 1 and y = 1:
\[ C'(2 \times 1 + 3, \; -2 \times 1 + 4) = C'(5, 2) \]
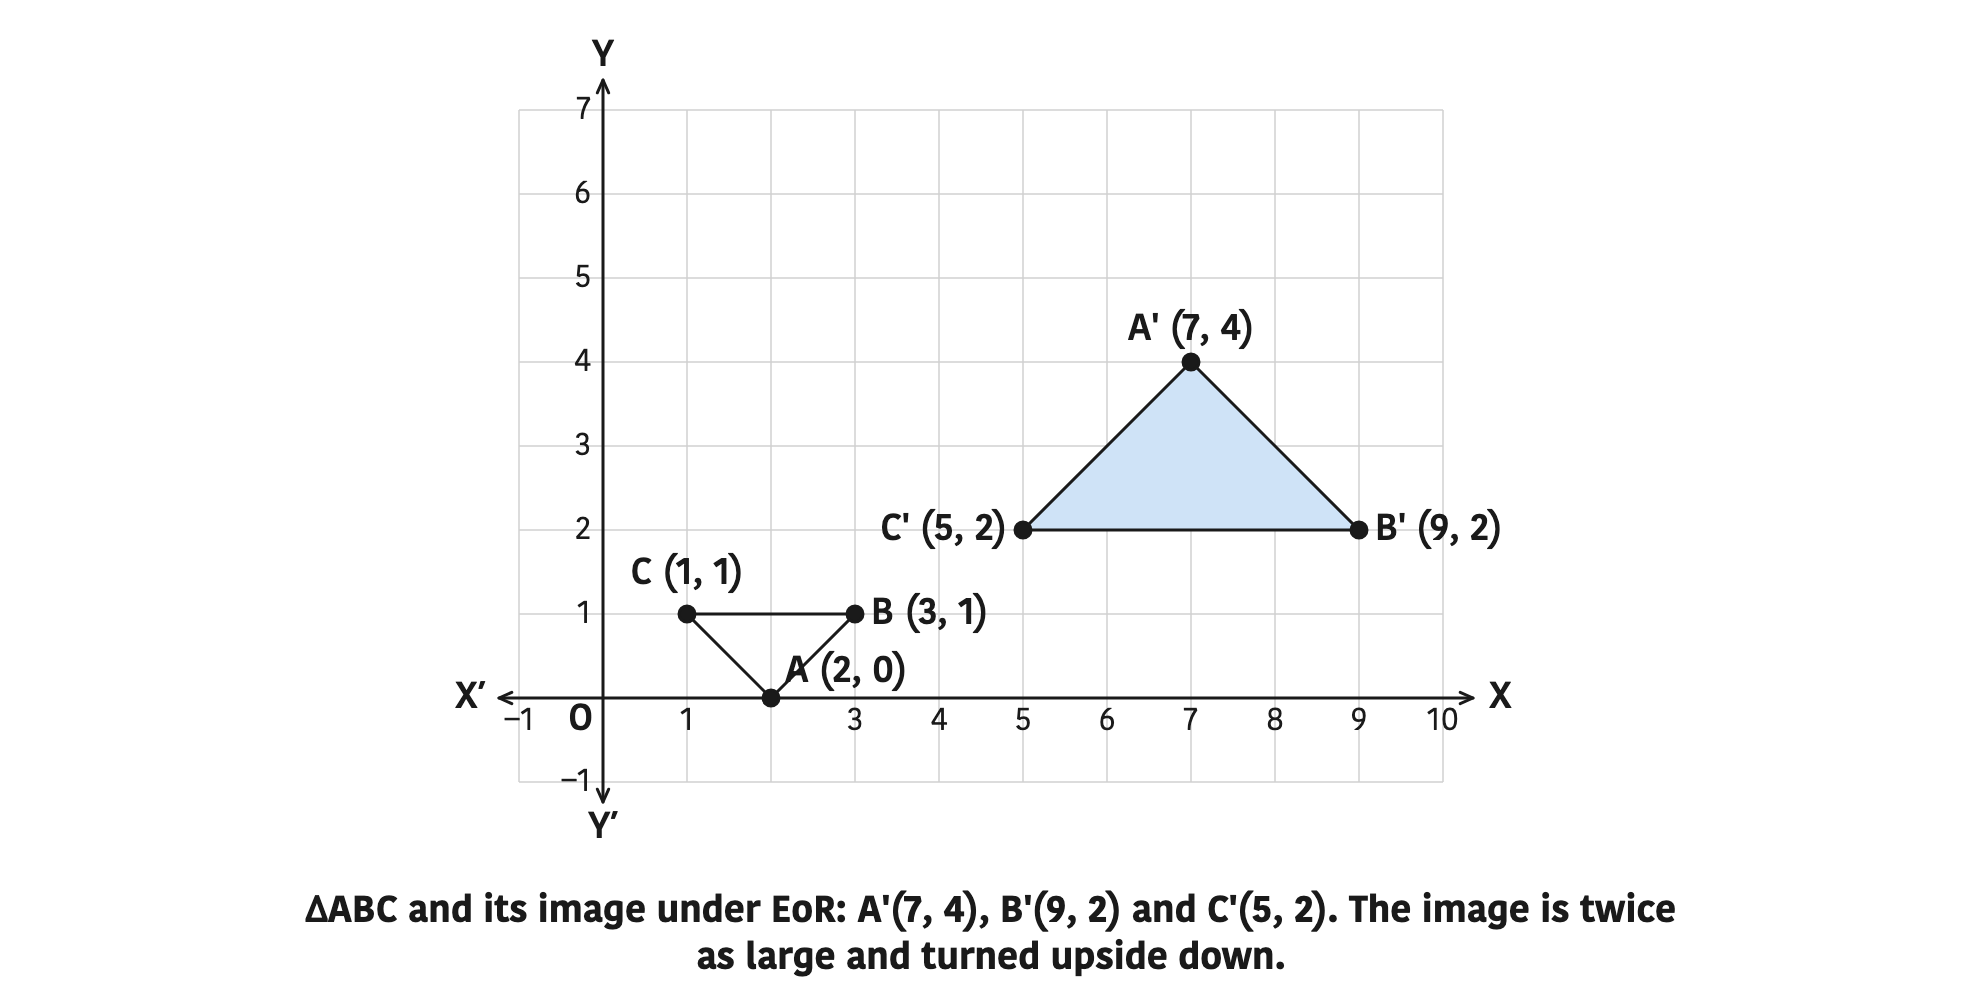
After the reflection in y = 0, the enlargement acts on -y, not on y. Write (x, -y) first and only then use the enlargement rule, or the sign of the y-coordinate comes out wrong.
Worked Example 3: Rotation About a Point Followed by Reflection
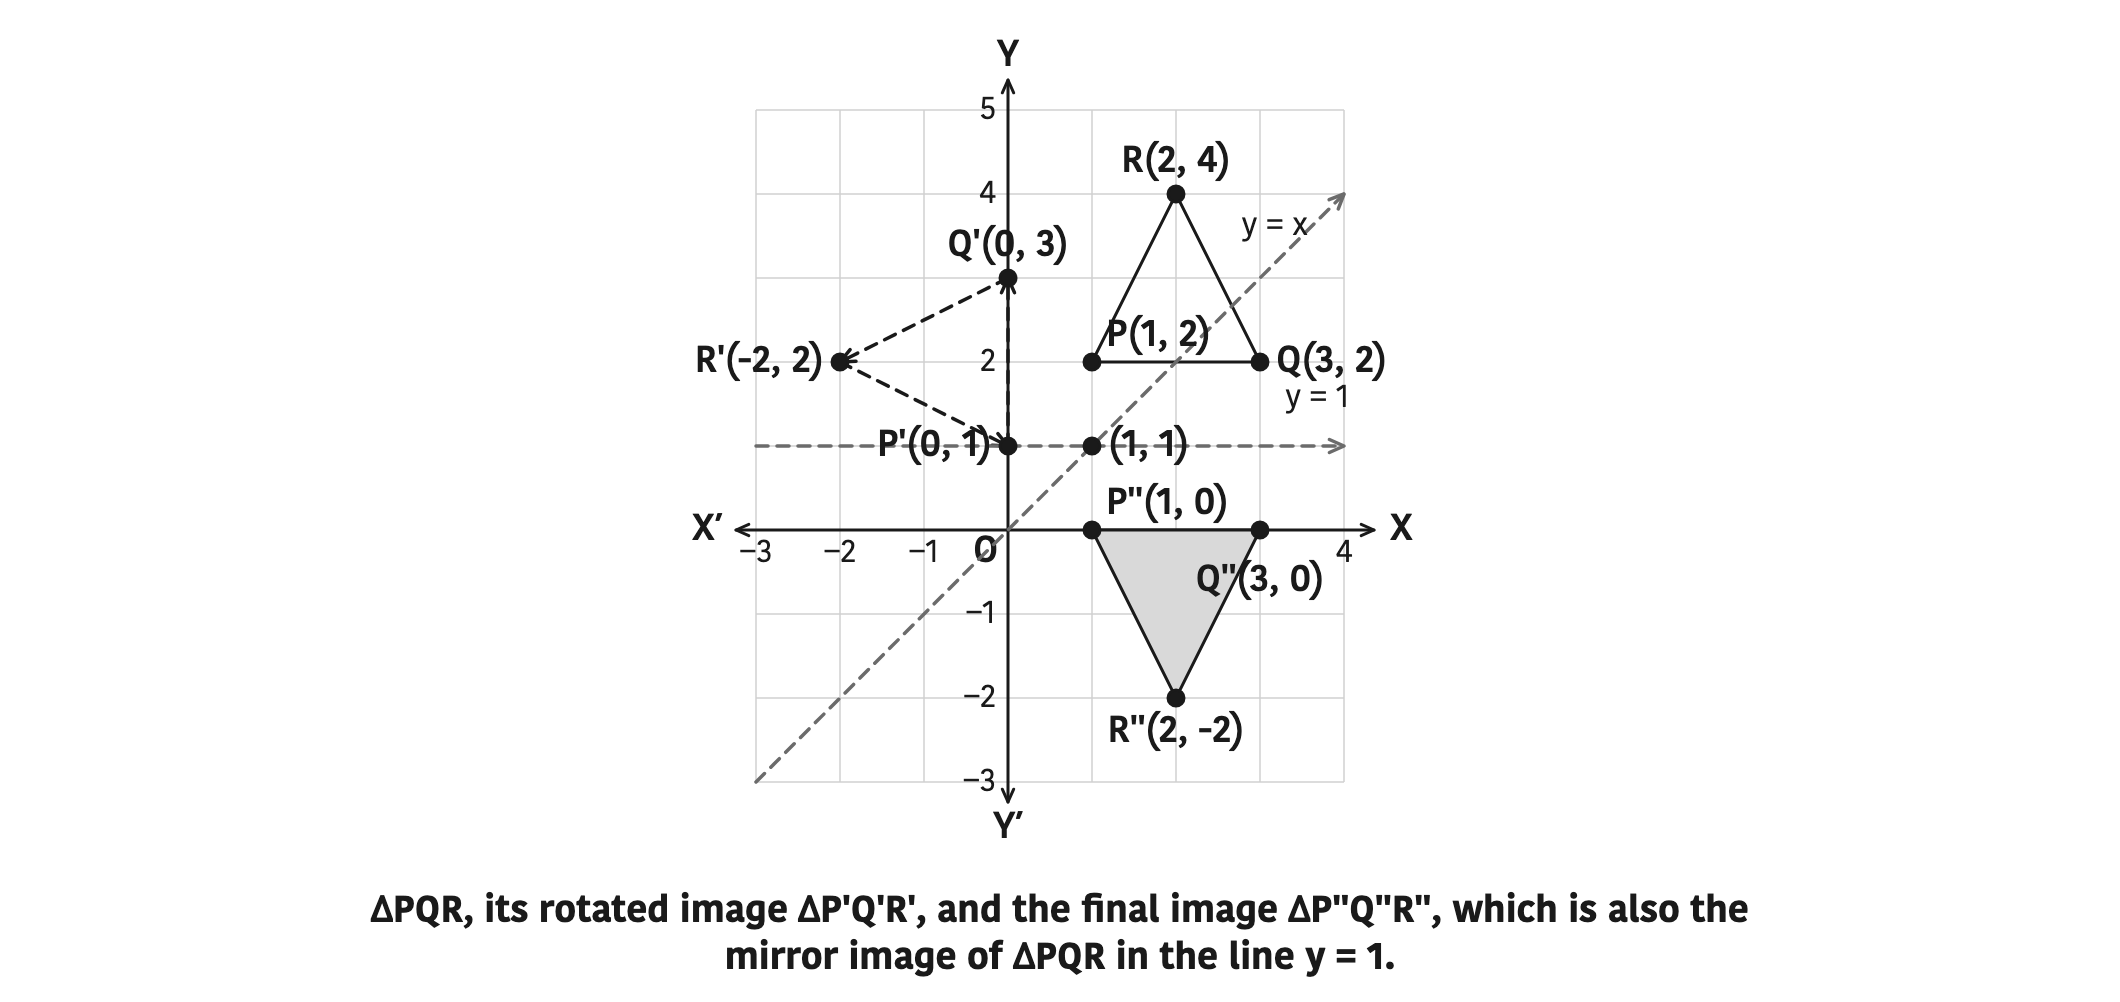
Triangle PQR has vertices P(1, 2), Q(3, 2) and R(2, 4). It is rotated through +90° about the point (1, 1), and the image is then reflected in the line y = x. Find the final image, and the single transformation that does the same job.
Step 1: A rotation of +90° about (a, b) sends (x, y) to (-(y - b) + a, (x - a) + b). With (a, b) = (1, 1) this is:
\[ (x, y) \to (-(y - 1) + 1, \; (x - 1) + 1) \]
Step 2: Simplifying the rule:
\[ (x, y) \to (2 - y, \; x) \]
Step 3: Using this rule on each vertex:
\[ P(1, 2) \to P'(0, 1) \]
\[ Q(3, 2) \to Q'(0, 3) \]
\[ R(2, 4) \to R'(-2, 2) \]
Step 4: Reflecting in y = x, which swaps each pair of coordinates:
\[ P'(0, 1) \to P''(1, 0) \]
\[ Q'(0, 3) \to Q''(3, 0) \]
\[ R'(-2, 2) \to R''(2, -2) \]
Step 5: Following a general point through both rules:
\[ (x, y) \to (2 - y, x) \to (x, 2 - y) \]
The x-coordinate stays the same and y becomes 2 - y. Reflection in the line y = k has the rule (x, 2k - y). Here 2k = 2, so k = 1. The single equivalent transformation is a reflection in the line y = 1. Check with P(1, 2): its mirror image in y = 1 is (1, 0), which is P''.
How to Show a Combined Transformation on a Graph
Many questions ask for the object and its images on one graph. Work in this order so that nothing is missed.
- Write the rule of the first transformation and find the first image of every vertex.
- Write the rule of the second transformation and apply it to the first image, never to the original object.
- Choose a scale, such as 5 small boxes = 1 unit, and draw the axes XOX' and YOY'.
- Plot the object, join its vertices, and write the coordinates beside each vertex.
- Plot the final image, marking its vertices with double primes such as A'', and shade it so it stands out from the object.
- Draw any mirror line, centre of rotation or centre of enlargement that was used, and label it.
One prime (A') marks the image after the first transformation and two primes (A'') mark the image after the second. When a combined rule such as EoR is used as one single step, its image may simply be marked A'.
Combined Transformations Around Us
Combined transformations happen all the time. On a phone, you zoom in on a photo (an enlargement) and then drag it across the screen (a translation). A printed border pattern is often made by reflecting one tile to make a matching pair and then turning that pair through 90° to fill the next side of the frame. In each case the second move acts on the result of the first, and doing the two moves in the other order can give a different result.
The full lesson is waiting for you
The notes are free to read in full. A free account opens the rest of the practice, and tracks your progress and confidence score for every subject. Presentations and videos need approval from Learn Yeti.