Finding Direction on a Map
On any map north is at the top, south at the bottom, east on the right and west on the left. Choose one place on the map, draw a line straight up and down through it and another straight across it, and the four main directions appear at once. A place lying between two of those lines is described by joining the two names, so we speak of north-east, south-east, south-west and north-west. That is how we say where one district sits in relation to another.
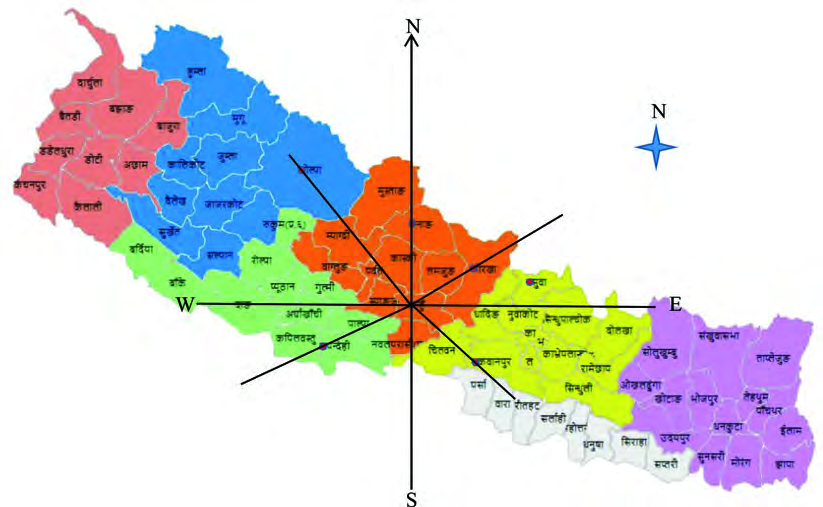
Standing at Tanahun on that map, Manang lies due north, Gorkha lies north-east and Makwanpur lies south-east. Words like these tell you roughly where a place is, but they do not tell you exactly. The phrase north-east does not say how far round from north you must turn. A pilot flying between two towns and a captain steering a ship need something sharper than a rough direction, so direction is given as a number of degrees instead.
What a Bearing Is
A bearing is the angle turned clockwise from the north line at a place until you are facing the place you want. It says exactly where the second place lies as seen from the first, and it is always written with three figures.
The idea is easy to picture. Stand at the first place and face north. Now turn clockwise, the way the hands of a clock move, until you are looking straight at the second place. The number of degrees you have turned through is the bearing. Because the turn is always clockwise and may go all the way round, a bearing can be anything from 0° up to 360°.
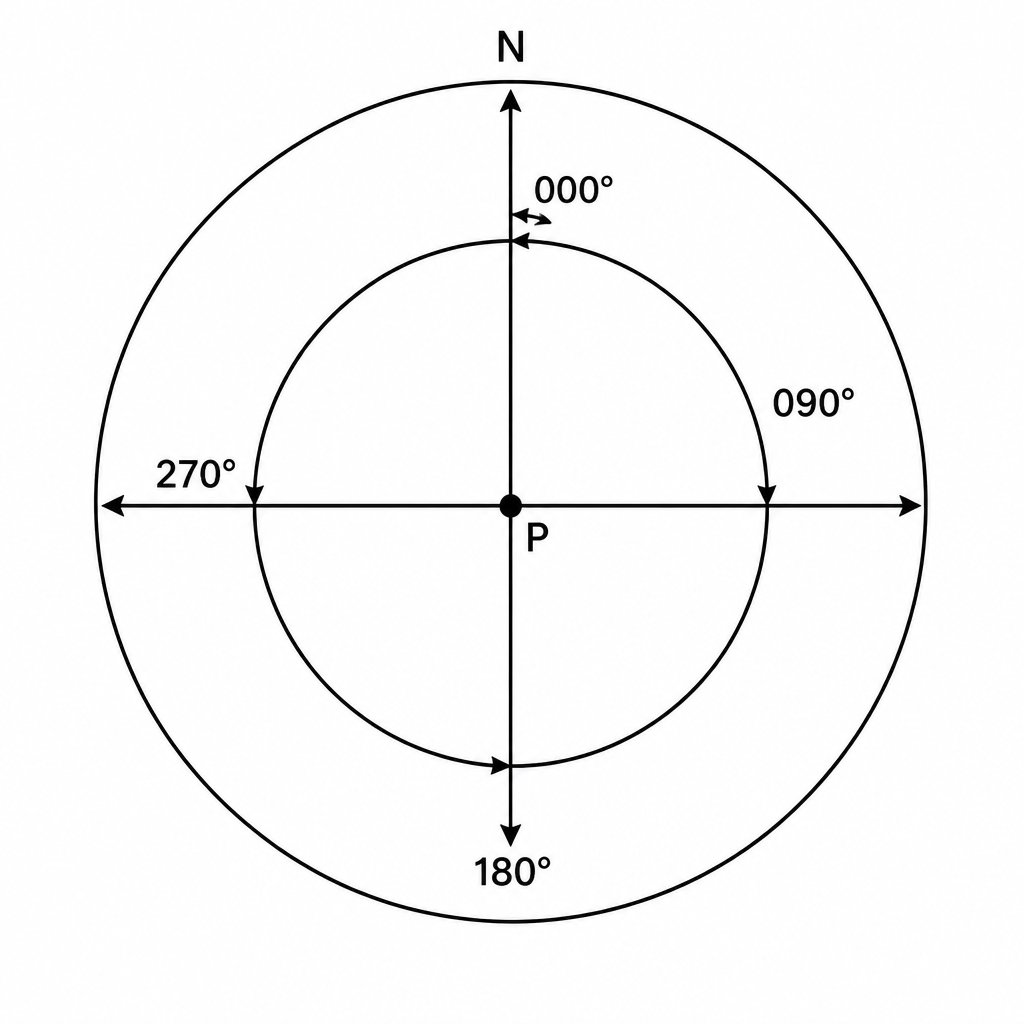
A bearing always carries three figures. Sixty degrees is written 060°, not 60°, and five degrees is written 005°. Writing it this way means nobody can wonder whether a figure has been dropped.
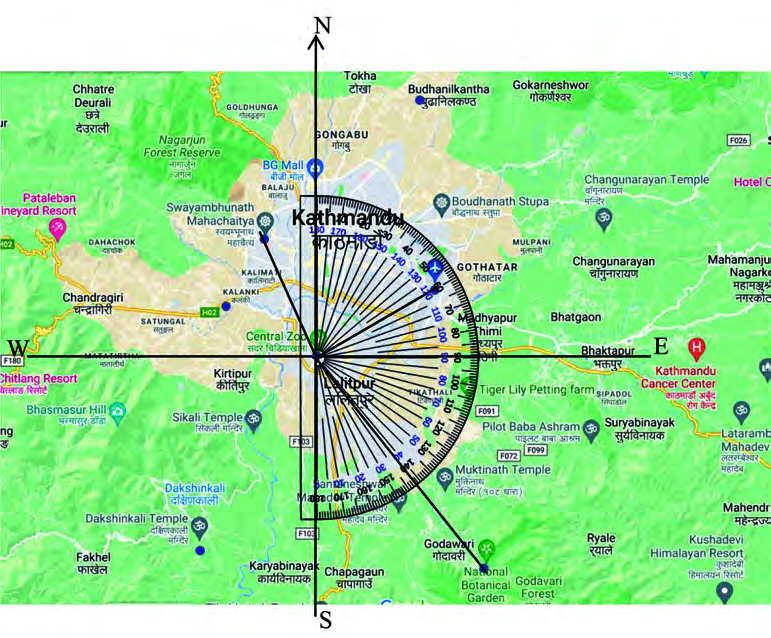
Put a protractor on a map of the Kathmandu valley with its centre on the zoo and the readings come straight off. The international airport lies on a bearing of 060°, the national botanical garden at Godavari lies on a bearing of 142° and Swayambhunath lies on a bearing of 335°. The place you stand at is the same for all three and so is the north line. Only the size of the clockwise turn changes.
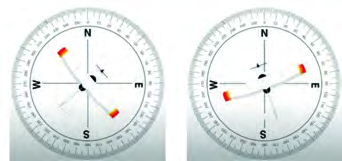
The compass on the screen of an aircraft does exactly the same job. Its needle holds steady on north and the dial shows the bearing the aircraft is flying along. Reading the compasses of two aircraft in flight, the first is flying on a bearing of 050° while the second is flying on a bearing of 340°.
Measuring a Bearing with a Protractor
When two places are marked on paper, the bearing between them is measured with a protractor. The steps below are done in order.
- At the point you are measuring from, draw a line straight up the page to stand for north.
- Put the centre of the protractor on that point and line its zero mark up with the north line.
- Count clockwise from the north line and read off the degrees where the line to the second point crosses the scale.
- Write that reading with three figures and a degree sign.
For example, draw the north line PN at P and then draw PA so that it makes an angle of 60° with PN. The bearing of A from P is then written like this:
\[ \angle NPA = 060^\circ \]
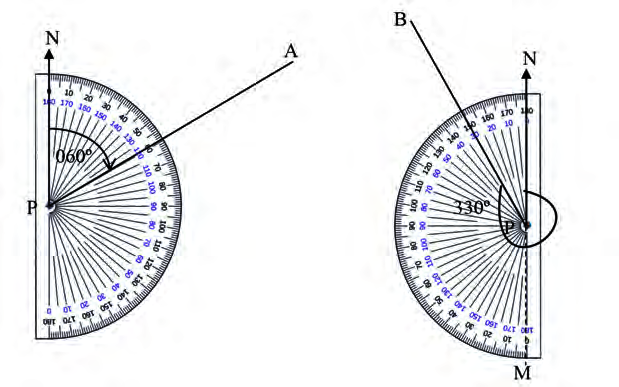
A protractor carries two rows of numbers. Read only the row that grows as you move clockwise away from the north line. Read the other row and 060° comes out as 120°, which points somewhere else entirely.
Bearings Bigger Than 180°
An ordinary protractor only measures up to 180°, yet a bearing can be larger than that. In such a case we use the fact that a full turn is 360°. Here is how a line PB on a bearing of 330° is drawn from the point P.
Step 1: The acute angle to be measured on the other side of the north line is:
\[ 360^\circ - 330^\circ = 30^\circ \]
Step 2: Draw PB so that it makes 30° with PN on the left hand side of north. The bearing of the line drawn this way is the reflex angle:
\[ \angle NPB = 330^\circ \]
Step 3: To check it, extend NP straight on to M. The reflex angle is now split into two parts:
\[ \angle NPM + \angle MPB = 180^\circ + 150^\circ \]
Step 4: Adding the two parts:
\[ 180^\circ + 150^\circ = 330^\circ \]
Both ways give the same 330°, so the line has been drawn in the right place.
The Bearing of One Place from the Other
If the bearing of S from R is 050°, the bearing of R from S is not 050° as well. You are now standing somewhere else, and a fresh north line has to be drawn at the new place. The north lines at the two places are parallel to each other, and that single fact is what gives the answer.
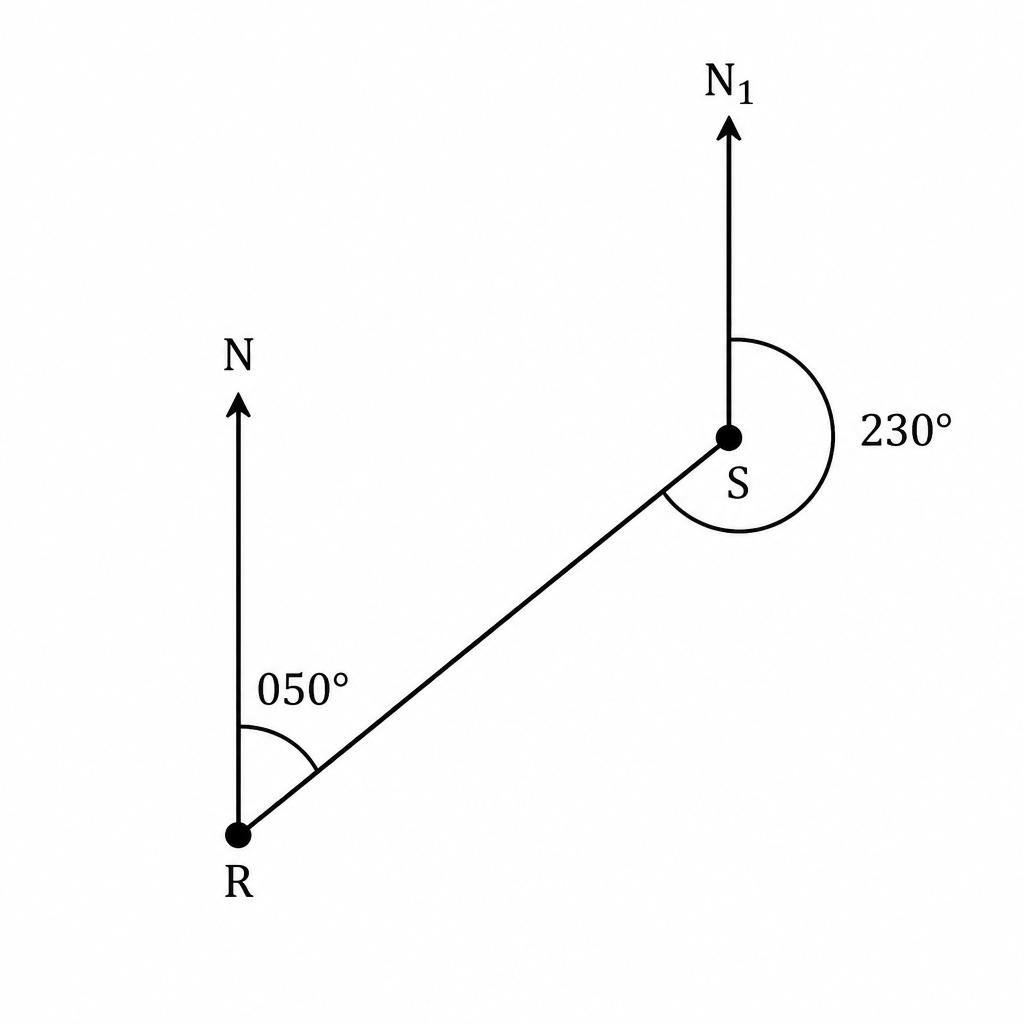
Step 1: Since the north line at R is parallel to the north line at S, the angles ∠NRS and ∠N₁SR are co-interior angles, so:
\[ \angle NRS + \angle N_1SR = 180^\circ \]
Step 2: Putting in the given value ∠NRS = 050°:
\[ 050^\circ + \angle N_1SR = 180^\circ \]
Step 3: Taking 050° from both sides:
\[ \angle N_1SR = 180^\circ - 050^\circ = 130^\circ \]
Step 4: That 130° lies on the left of the north line, so the clockwise bearing is what is left of the full turn:
\[ 360^\circ - 130^\circ = 230^\circ \]
So the bearing of R from S is 230°. Notice that the two bearings differ by exactly 180°. That is always true, which means you do not have to measure the angle again every time.
If the given bearing is less than 180°, add 180° to it. If it is 180° or more, take 180° away from it. The answer always stays between 000° and 360°.
| Bearing of B from A | Bearing of A from B |
| 030° | 210° |
| 075° | 255° |
| 200° | 020° |
| 310° | 130° |
Adding 180° to 265° to get 445° is wrong. A full turn is only 360°, so no bearing can be larger than that. Since 265° is the bigger one, you subtract, and the answer is 085°.
What a Scale Is
A plot of land, a road or a whole country is far too big to draw on paper at its true size. A tiny part inside a watch has the opposite problem, since drawing it at its true size shows almost nothing. So before anything is drawn, a fixed ratio is settled between the real measurement and the measurement on paper.
A scale is the fixed ratio between a length on the drawing and the length it stands for in real life. A picture made using such a ratio is called a scale drawing.
- With a scale, objects that are far too big and objects that are far too small can both be drawn on ordinary paper.
- When a map is made, the real size and the drawn size are fixed into one definite ratio, chosen to suit what is being drawn.
- Once a map has been made with a definite scale, the real size of the thing shown can be worked back out from it.
A scale is written in two ways. One way names the units, such as 1 cm = 500 m. The other way is a plain ratio with no units, such as 1 : 200, which means that one unit of any kind on the drawing stands for 200 of the same units in real life.
| Scale | What it means |
| 1 cm = 500 m | 1 cm on paper stands for 500 m on the ground |
| 1 cm = 200 miles | 1 cm on paper stands for 200 miles |
| 1 : 200 | 1 length on the drawing stands for 200 such lengths in reality |
| 1 : 3 | the drawing is three times smaller than the real thing |
From Map Distance to Real Distance
On a map drawn to a scale of 1 cm = 500 m, the distance between two places measures 6 cm. Here is how the real distance is found.
Step 1: The scale the map was drawn to is:
\[ 1\ \text{cm} = 500\ \text{m} \]
Step 2: Every centimetre on the map stands for 500 m, so multiply the 6 cm by 500:
\[ 6 \times 500 = 3000\ \text{m} \]
Step 3: Changing metres into kilometres:
\[ 3000\ \text{m} = 3\ \text{km} \]
So the two places are really 3 km apart.
Writing the answer as just 3000 is wrong. There is an enormous difference between 3000 m and 3000 km. Work the answer out first in the unit the scale is written in, and only then change it into the unit you want.
From Real Distance to Map Distance
When you are the one making the map, the work runs the other way. A path that is really 2 km long has to be drawn to a scale of 1 cm = 500 m. How long should the line on the paper be?
Step 1: Change the real distance into the unit used in the scale:
\[ 2\ \text{km} = 2000\ \text{m} \]
Step 2: Each 500 m is shown by 1 cm, so divide 2000 by 500:
\[ 2000 \div 500 = 4 \]
Step 3: The length of the line to be drawn on the paper is:
\[ 4\ \text{cm} \]
Making a Scale Drawing Step by Step
When both a bearing and a distance are given, the drawing is built up in order. Follow the steps below and the picture comes out right on its own.
- Choose the scale first. It must be small enough for the longest distance to fit on the paper, and large enough for the shortest distance still to be worth measuring.
- Divide each real distance by the scale to get the length it will have on the paper.
- Mark the starting point and draw a north line straight up the page from it.
- With the protractor, measure the given bearing clockwise from that north line and make a small mark.
- Along that direction measure the calculated length with a ruler and mark the next point.
- At the new point draw its own north line and repeat the same work.
- Finally write the scale that was used along the edge of the drawing.
Bearing and Scale Working Together
An aeroplane leaves P and flies 600 miles on a bearing of 060° to reach Q. From Q it flies a further 800 miles on a bearing of 145° to reach R. Using a scale of 1 cm = 200 miles, we can draw the two flights and read off both the real distance from P to R and the bearing of P as seen from R.
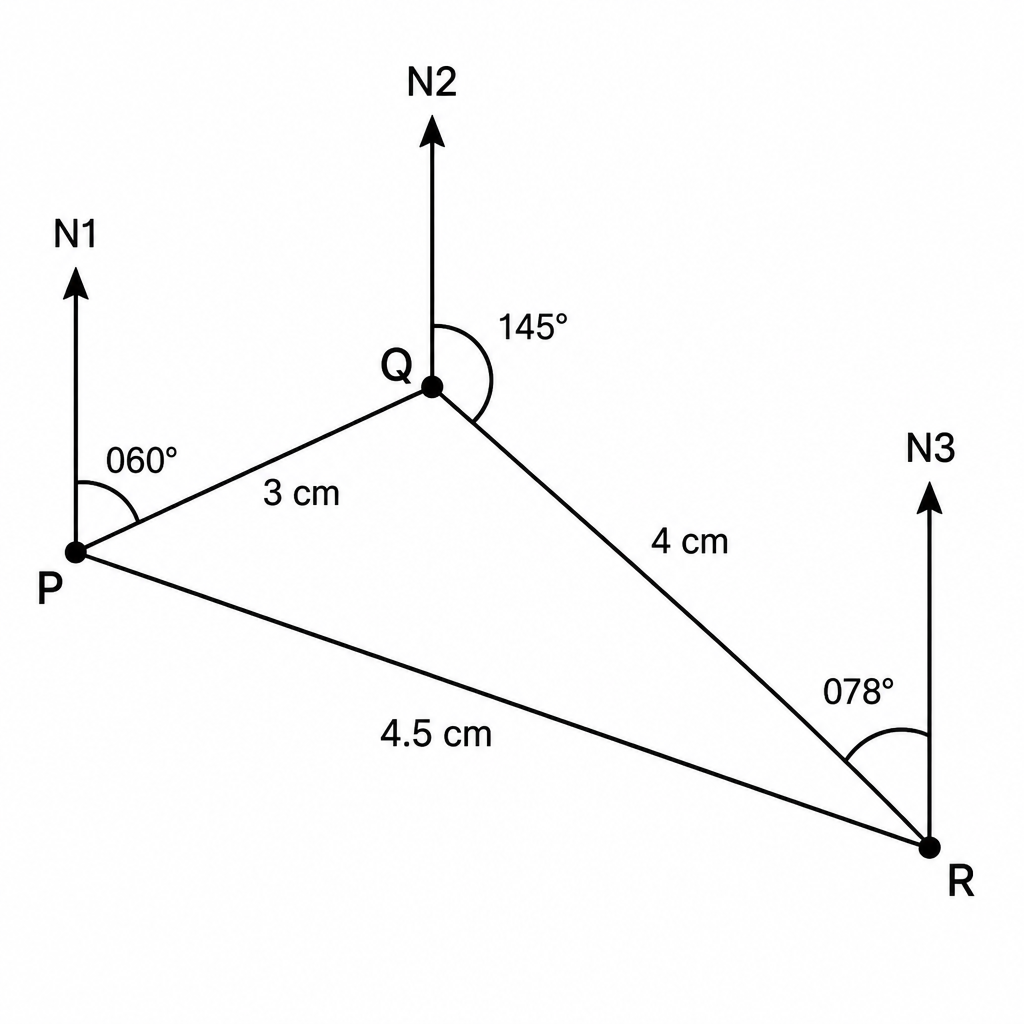
Step 1: The length that represents PQ on the paper is:
\[ 600 \div 200 = 3\ \text{cm} \]
Step 2: The length that represents QR is:
\[ 800 \div 200 = 4\ \text{cm} \]
Step 3: Draw the north line at P, measure 060° and mark Q at 3 cm. Draw the north line at Q, measure 145° and mark R at 4 cm. Joining P to R and measuring it with a ruler gives:
\[ PR = 4.5\ \text{cm} \]
Step 4: Multiplying that measurement by the scale gives the real distance:
\[ 4.5 \times 200 = 900\ \text{miles} \]
Step 5: Draw the north line N₃ at R and measure the angle it makes with RP:
\[ \angle N_3RP = 078^\circ \]
Step 6: That angle lies on the left of the north line, so the bearing of P from R is what remains of the full turn:
\[ 360^\circ - 078^\circ = 282^\circ \]
So P and R are really 900 miles apart and the bearing of P from R is 282°. Notice that these answers came from measuring a carefully drawn picture, not from a calculation. The neater and truer the drawing, the closer the answers are.
Making a Shape Smaller or Larger with a Scale
A scale is not only for maps. It is also how a shape is copied smaller or larger. Draw a rectangle ABCD on squared paper and make every side three times as long, and the new rectangle EFGH appears. The scale between ABCD and EFGH is 1 : 3.
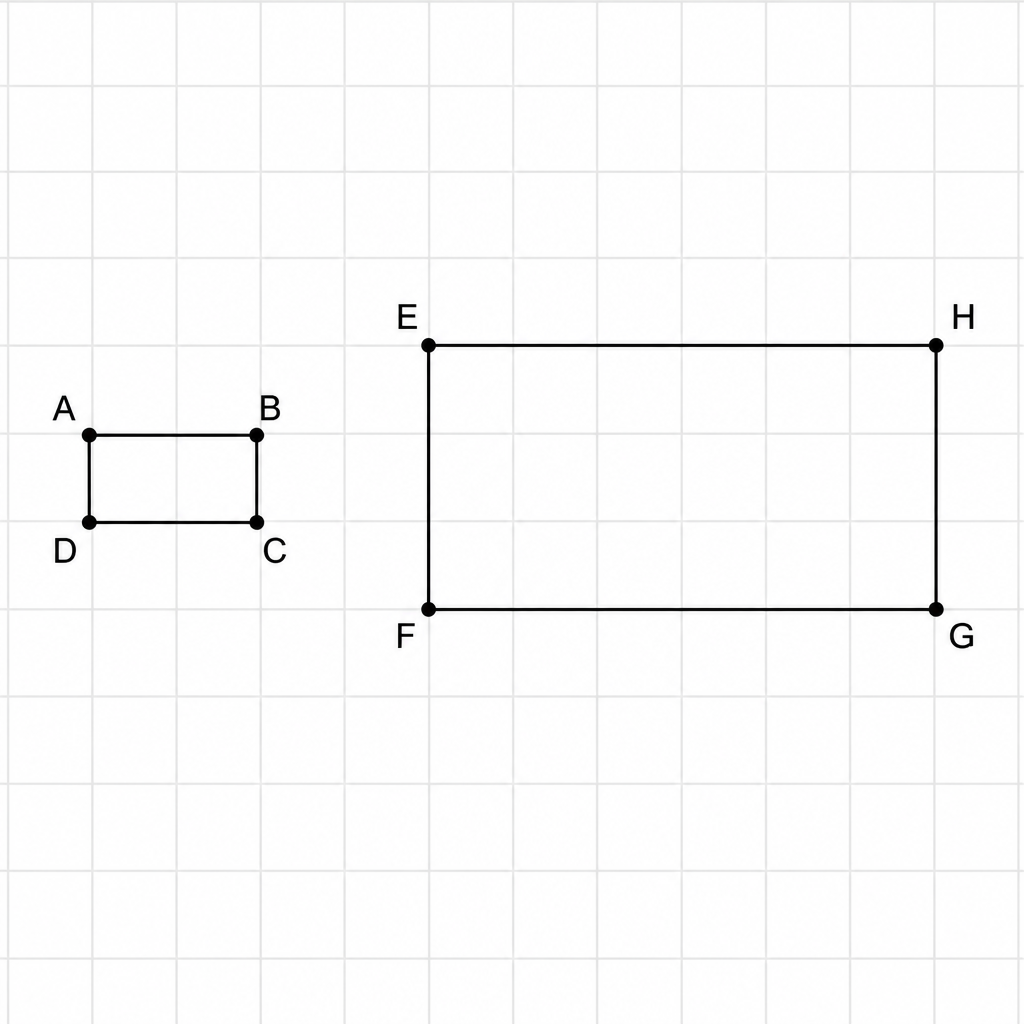
Two things follow from this. First, corresponding sides of the two shapes are always in the ratio given by the scale. Second, corresponding angles stay equal, because a scale does not touch angles at all. So a shape is halved with a scale of 1 : 2, doubled with a scale of 2 : 1, made ten times smaller with a scale of 1 : 10 and ten times larger with a scale of 10 : 1.
In a scale drawing the lengths change but the shape does not. The small picture and the large picture are similar to each other.
The full lesson is waiting for you
The notes are free to read in full. A free account opens the rest of the practice, and tracks your progress and confidence score for every subject. Presentations and videos need approval from Learn Yeti.